<?xml version="1.0" encoding="utf-8"?><feed xmlns="http://www.w3.org/2005/Atom" ><generator uri="https://jekyllrb.com/" version="3.10.0">Jekyll</generator><link href="http://log.noworseoff.com/feed.xml" rel="self" type="application/atom+xml" /><link href="http://log.noworseoff.com/" rel="alternate" type="text/html" /><updated>2026-11-05T19:08:26+00:00</updated><id>http://log.noworseoff.com/feed.xml</id><title type="html">SouleMike</title><subtitle>Some short ramblings about PowerShell, Azure, Windows, AWS, and other things.</subtitle><author><name>Mike Soule</name></author><entry><title type="html">A Hybrid Identity Maturity Model That Actually Delivers Security Outcomes</title><link href="http://log.noworseoff.com/2026/09/14/hybrid-identity-maturity.html" rel="alternate" type="text/html" title="A Hybrid Identity Maturity Model That Actually Delivers Security Outcomes" /><published>2026-09-14T00:00:00+00:00</published><updated>2026-09-14T00:00:00+00:00</updated><id>http://log.noworseoff.com/2026/09/14/hybrid-identity-maturity</id><content type="html" xml:base="http://log.noworseoff.com/2026/09/14/hybrid-identity-maturity.html"><![CDATA[<p><a href="https://www.hipconf.com/resources/a-hybrid-identity-maturity-model-that-actually-delivers-security-outcomes/">Summary blog for this presentation at HIP Conf 2026.</a></p>

<p>Identity maturity is useful only when it changes risk.</p>

<p>A program can deploy MFA, migrate a SIEM, improve endpoint coverage, and still leave the weaknesses that make an identity attack dangerous. The practical test is whether the work reduces standing privilege, removes weak authentication, closes orphaned access, improves detection, or shortens recovery.</p>

<p>That is the premise behind the hybrid identity maturity model I presented at HIPconf 2026. The model organizes the work into four practices, 10 processes, 27 capabilities, and three maturity levels. More importantly, it ties progression to observable security outcomes rather than a score for its own sake.</p>

<blockquote>
  <p>Slide references below use the visible conference deck numbering.</p>
</blockquote>

<p><img src="https://raw.githubusercontent.com/soulemike/soulemike.github.io/refs/heads/main/assets/hybrid-identity-maturity/slide-02-title.png" alt="Slide 2: A Hybrid Identity Maturity Model that Actually Delivers Security Outcomes" /></p>

<p><em>Slide 2: The presentation starts with a simple requirement for the model: maturity has to deliver a security outcome.</em></p>

<h2 id="maturity-scores-can-describe-motion-without-proving-security">Maturity scores can describe motion without proving security</h2>

<p>Most maturity models are good at inventorying activity. That can still be useful. It tells us what exists, where capabilities are deployed, and what work has been completed.</p>

<p>The problem appears when those measures become the definition of success.</p>

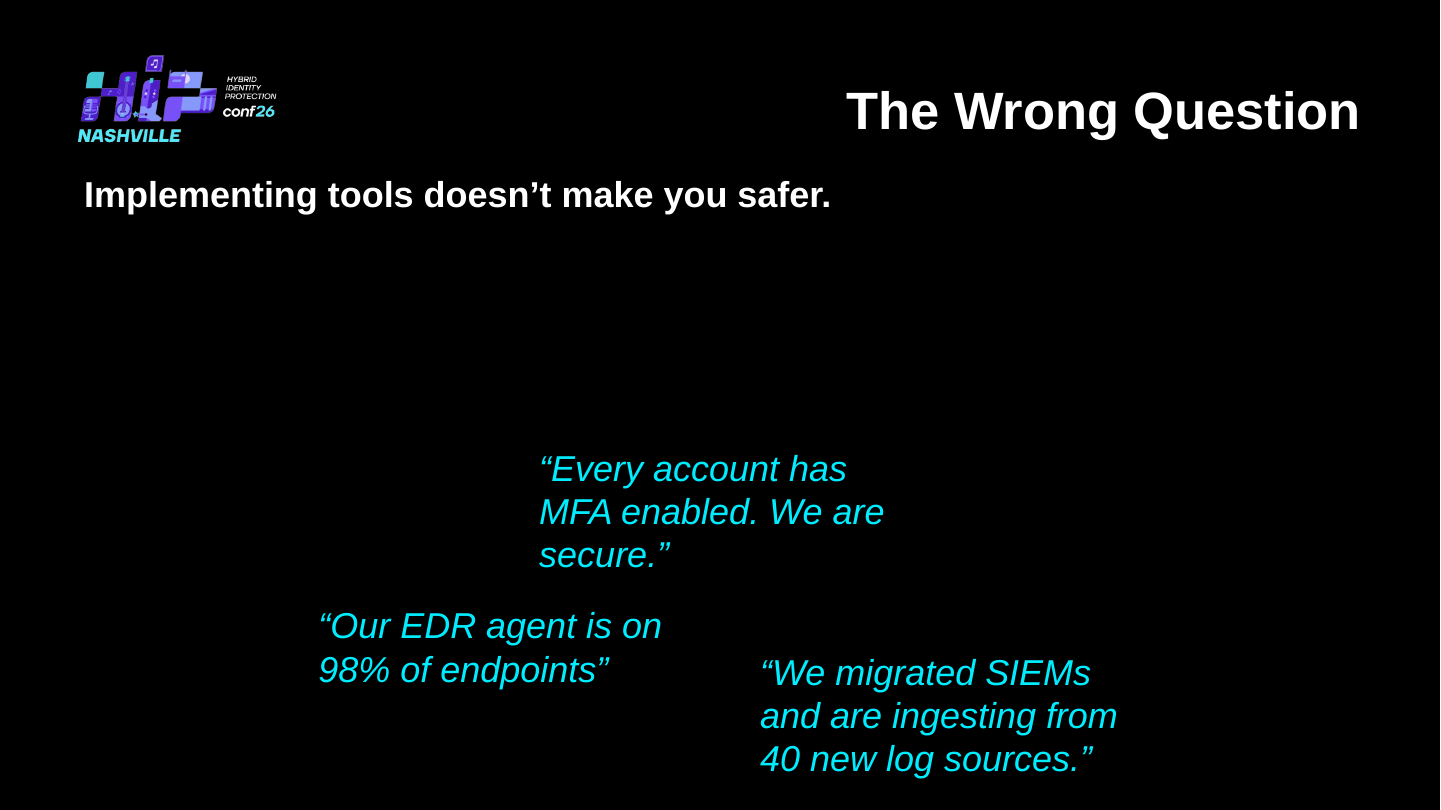
<p>Slide 11 uses three familiar examples: endpoint agent coverage, MFA enablement, and new SIEM log sources. Each can represent meaningful progress. None independently answers whether exposure to harm is lower. A control can be deployed broadly and still be weak, inconsistently enforced, poorly governed, or disconnected from the assets that matter most.</p>

<p><img src="https://raw.githubusercontent.com/soulemike/soulemike.github.io/refs/heads/main/assets/hybrid-identity-maturity/slide-11-wrong-question.png" alt="Slide 11: The Wrong Question" /></p>

<p><em>Slide 11: Tool deployment and coverage are inputs. The security question is whether the resulting exposure changed.</em></p>

<p>The more useful operating question is the one introduced on Slide 12: <strong>Are we more secure?</strong> That forces the program to connect implementation work to weaknesses removed and risk controlled.</p>

<h2 id="security-outcomes-are-the-business-question">Security outcomes are the business question</h2>

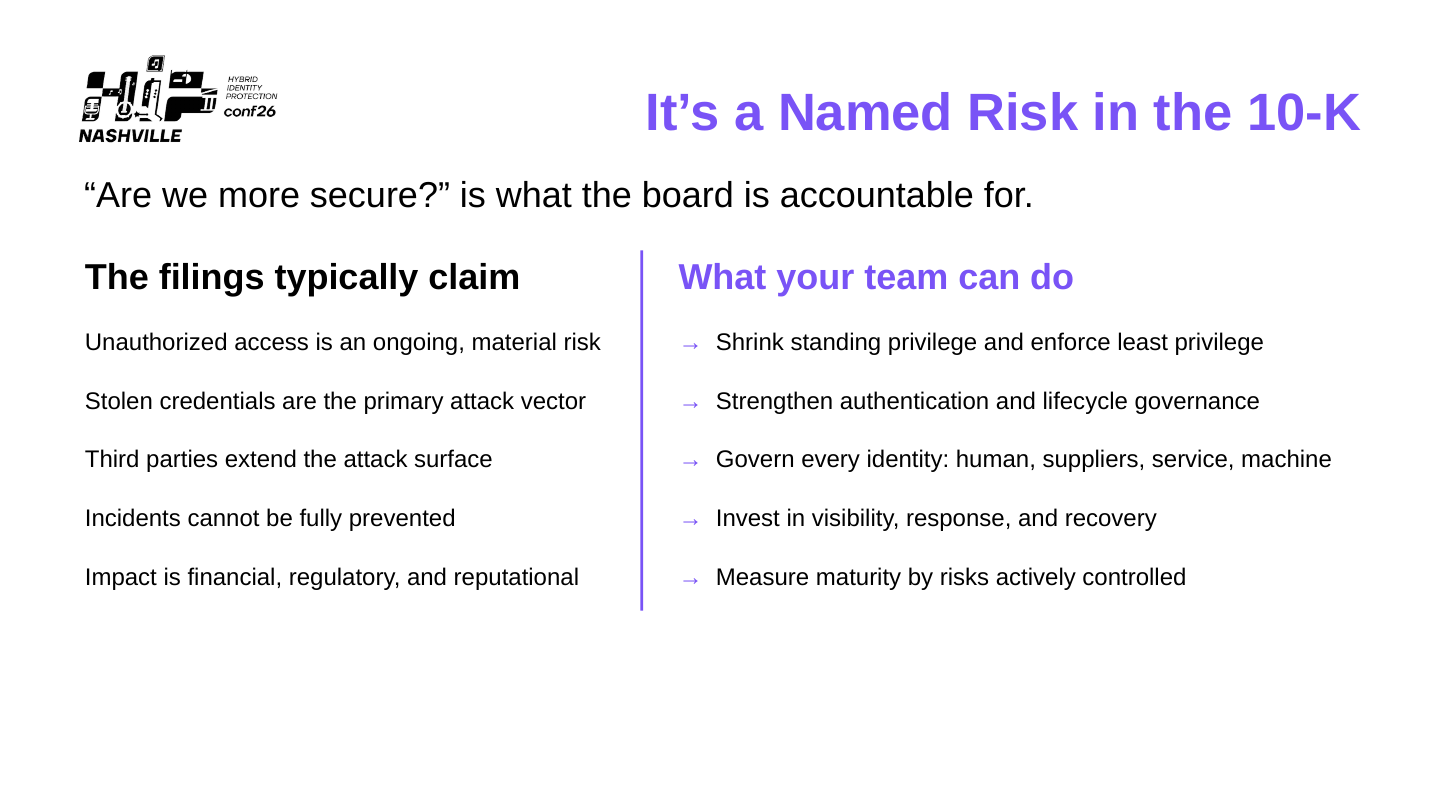
<p>Identity risk is already a business issue. Slide 18 frames common corporate risk statements around unauthorized access, stolen credentials, third parties, unavoidable incidents, and financial, regulatory, and reputational impact. It then maps those concerns to actions an identity program can actually take.</p>

<p>Shrink standing privilege. Strengthen authentication and lifecycle governance. Govern human and machine identities. Improve visibility, response, and recovery. Measure maturity by risks actively controlled.</p>

<p><img src="https://raw.githubusercontent.com/soulemike/soulemike.github.io/refs/heads/main/assets/hybrid-identity-maturity/slide-18-named-risk.png" alt="Slide 18: It’s a Named Risk in the 10-K" /></p>

<p><em>Slide 18: The model connects enterprise risk statements to identity controls that can materially reduce exposure.</em></p>

<p>Slide 23 extends that idea into a set of operational outcomes: reduced standing privileges, better visibility, stronger governance and accountability, faster response and recovery, and more automation with less toil. Those outcomes are useful because they change how leaders can prioritize investment. A new platform, policy, or automation should make one or more of them measurably better.</p>

<h2 id="hybrid-identity-is-where-accumulated-exceptions-become-risk">Hybrid identity is where accumulated exceptions become risk</h2>

<p>Hybrid environments rarely fail because one team designed them badly. They become complicated over time.</p>

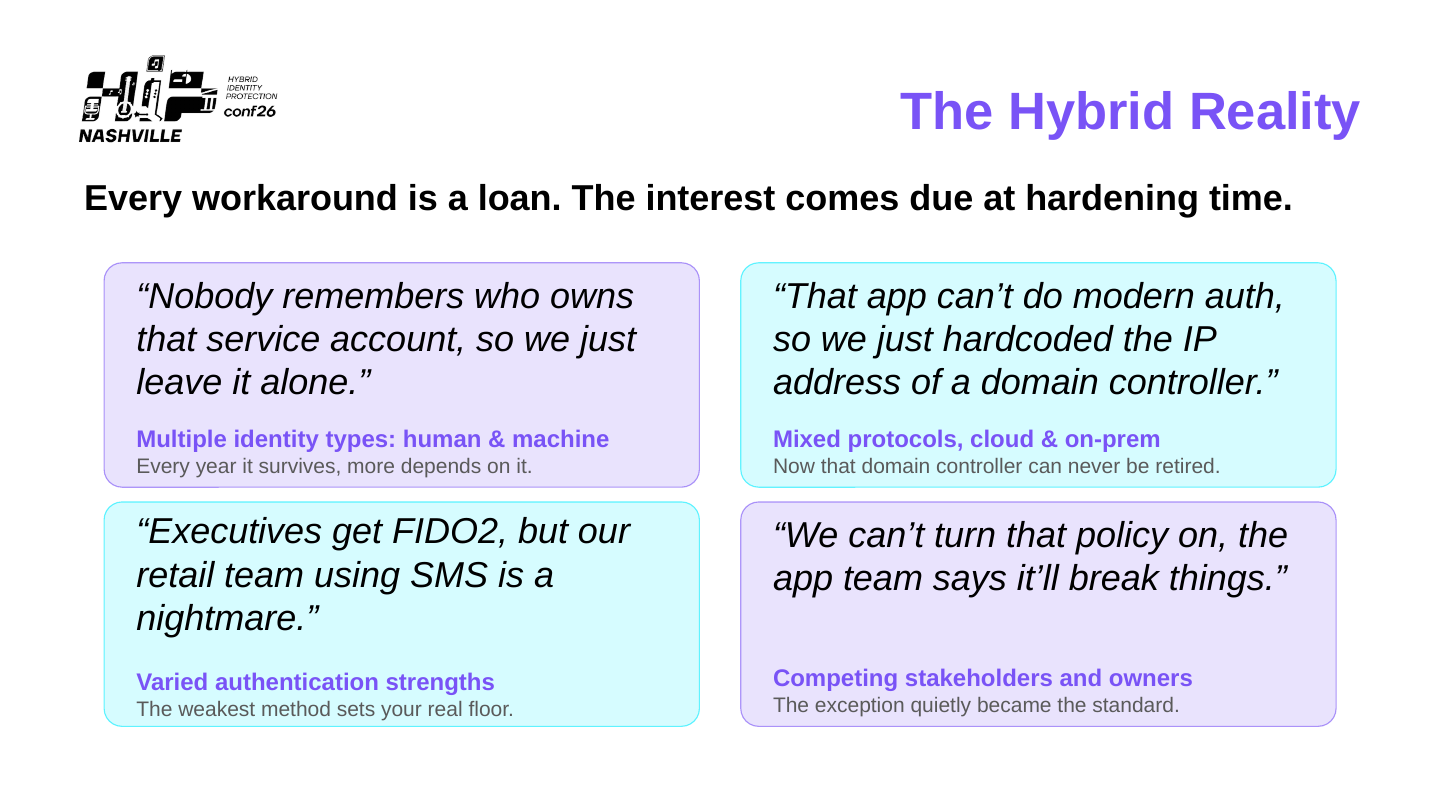
<p>A service account survives because nobody is sure what depends on it. An application keeps a hardcoded dependency on a domain controller because modernization was deferred. One workforce gets phishing-resistant authentication while another remains on SMS. A policy stays disabled because an application owner expects it to break something.</p>

<p>The result is accumulated dependency. Slide 27 describes this with a useful analogy: <strong>every workaround is a loan, and the interest comes due at hardening time.</strong></p>

<p><img src="https://raw.githubusercontent.com/soulemike/soulemike.github.io/refs/heads/main/assets/hybrid-identity-maturity/slide-27-hybrid-reality.png" alt="Slide 27: The Hybrid Reality" /></p>

<p><em>Slide 27: Long-lived workarounds create dependencies across identity types, protocols, authentication strengths, and organizational ownership.</em></p>

<p>This matters because the weakest part of the environment establishes the practical floor. A highly mature cloud control does not remove the exposure created by an unmanaged service account or a legacy authentication path that still reaches something important.</p>

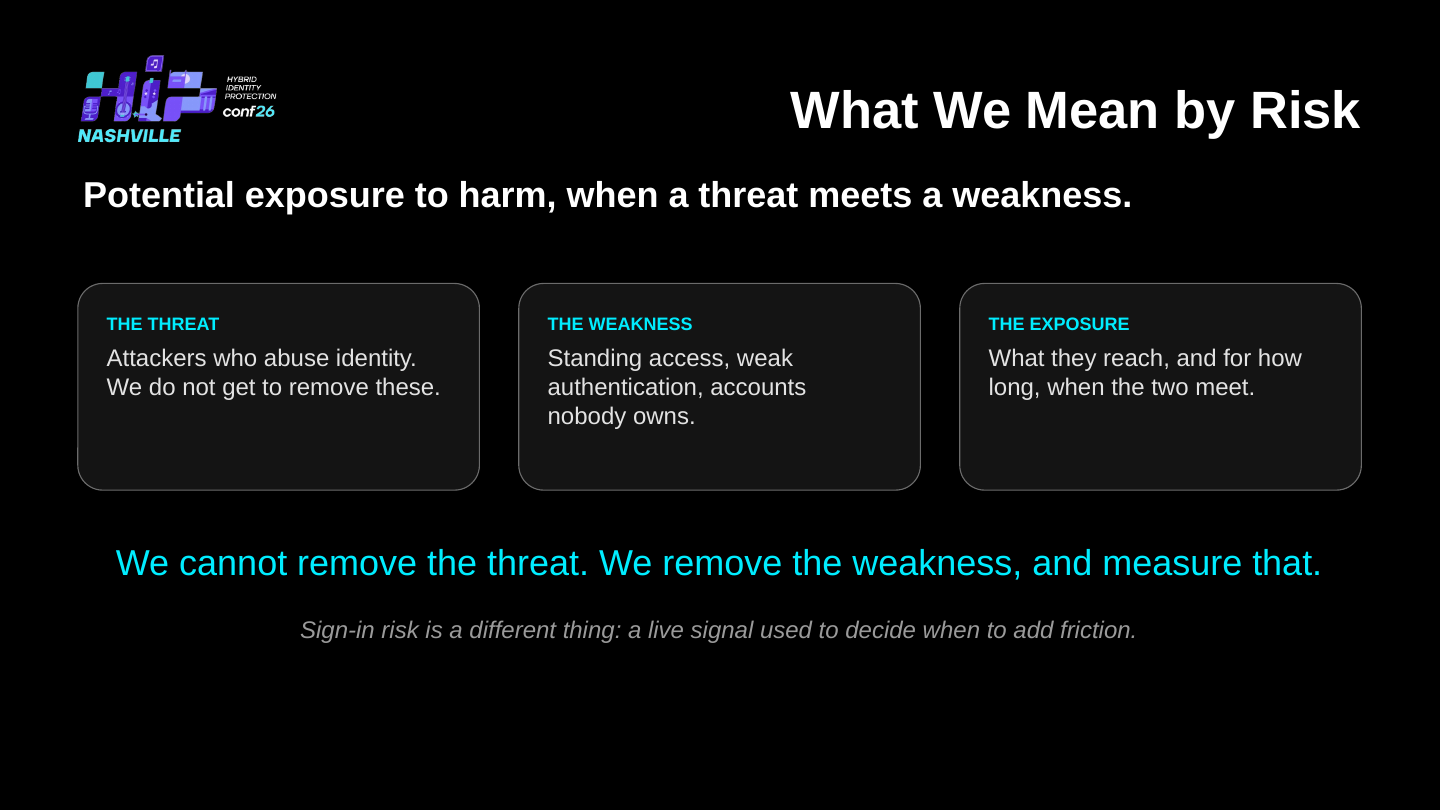
<p>Slide 28 gives the model a concrete definition of risk: a threat meets a weakness and creates exposure. Attackers are the threat. Standing access, weak authentication, and accounts without clear ownership are weaknesses. Exposure is what an attacker can reach, and for how long, when the two meet.</p>

<p><img src="https://raw.githubusercontent.com/soulemike/soulemike.github.io/refs/heads/main/assets/hybrid-identity-maturity/slide-28-risk.png" alt="Slide 28: What We Mean by Risk" /></p>

<p><em>Slide 28: The model focuses measurement on weaknesses because that is the part of the risk equation the identity program can directly change.</em></p>

<p>That distinction gives the maturity model something useful to measure. The program may not be able to remove the threat, but it can remove weaknesses and reduce the resulting exposure.</p>

<h2 id="a-maturity-model-needs-a-test">A maturity model needs a test</h2>

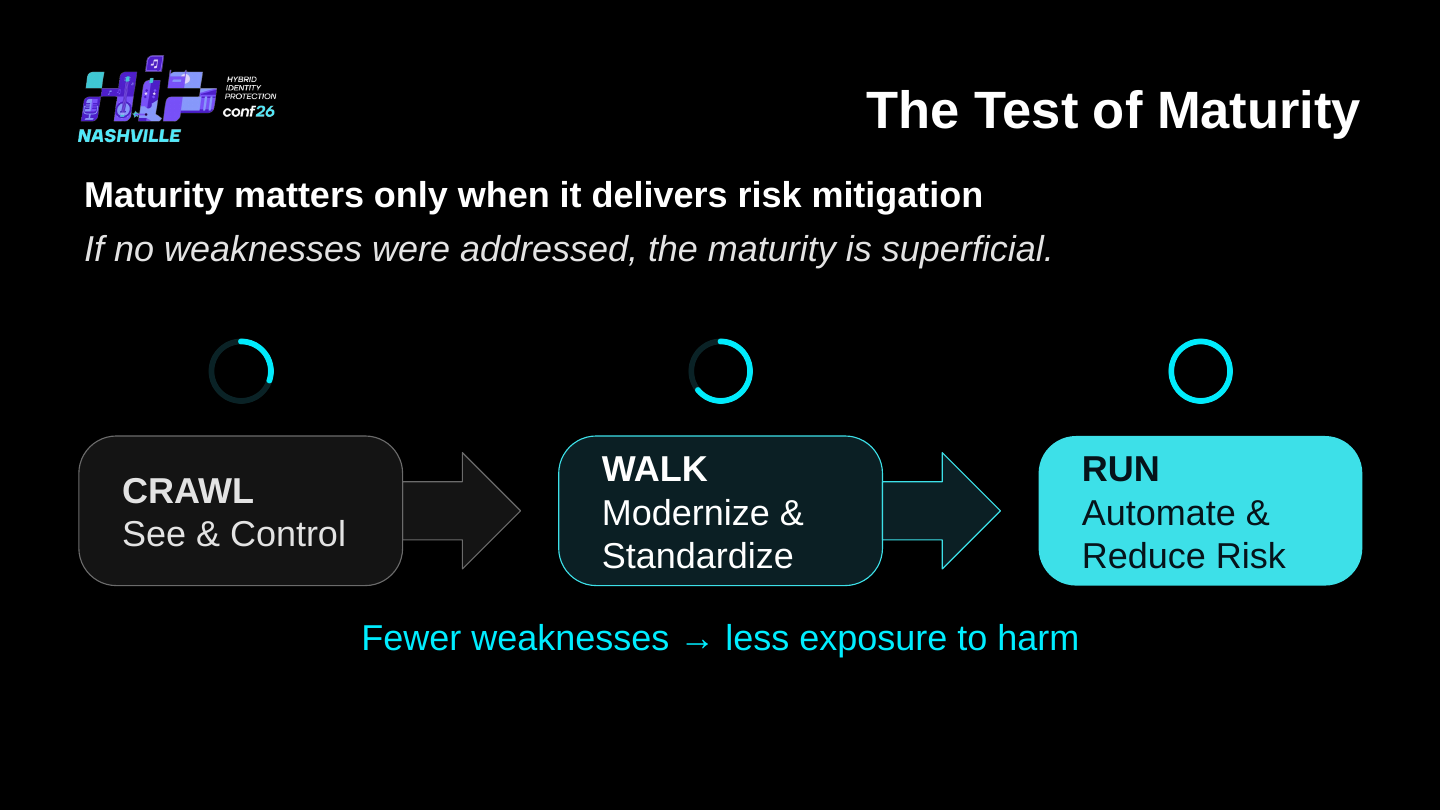
<p>The test is simple: <strong>what weakness was removed?</strong></p>

<p>Slide 31 organizes the progression into Crawl, Walk, and Run. Crawl is about seeing and controlling the environment. Walk modernizes and standardizes it. Run automates proven controls and reduces risk at scale.</p>

<p><img src="https://raw.githubusercontent.com/soulemike/soulemike.github.io/refs/heads/main/assets/hybrid-identity-maturity/slide-31-test-of-maturity.png" alt="Slide 31: The Test of Maturity" /></p>

<p><em>Slide 31: Crawl, Walk, and Run represent increasing ability to remove weaknesses, not increasingly impressive labels.</em></p>

<p>This sequencing matters. Automation applied to an environment that is still poorly understood can scale the wrong decision. Standardization applied before visibility can normalize incomplete data. Maturity has to create the conditions for the next stage.</p>

<h2 id="four-practices-each-with-an-observable-outcome">Four practices, each with an observable outcome</h2>

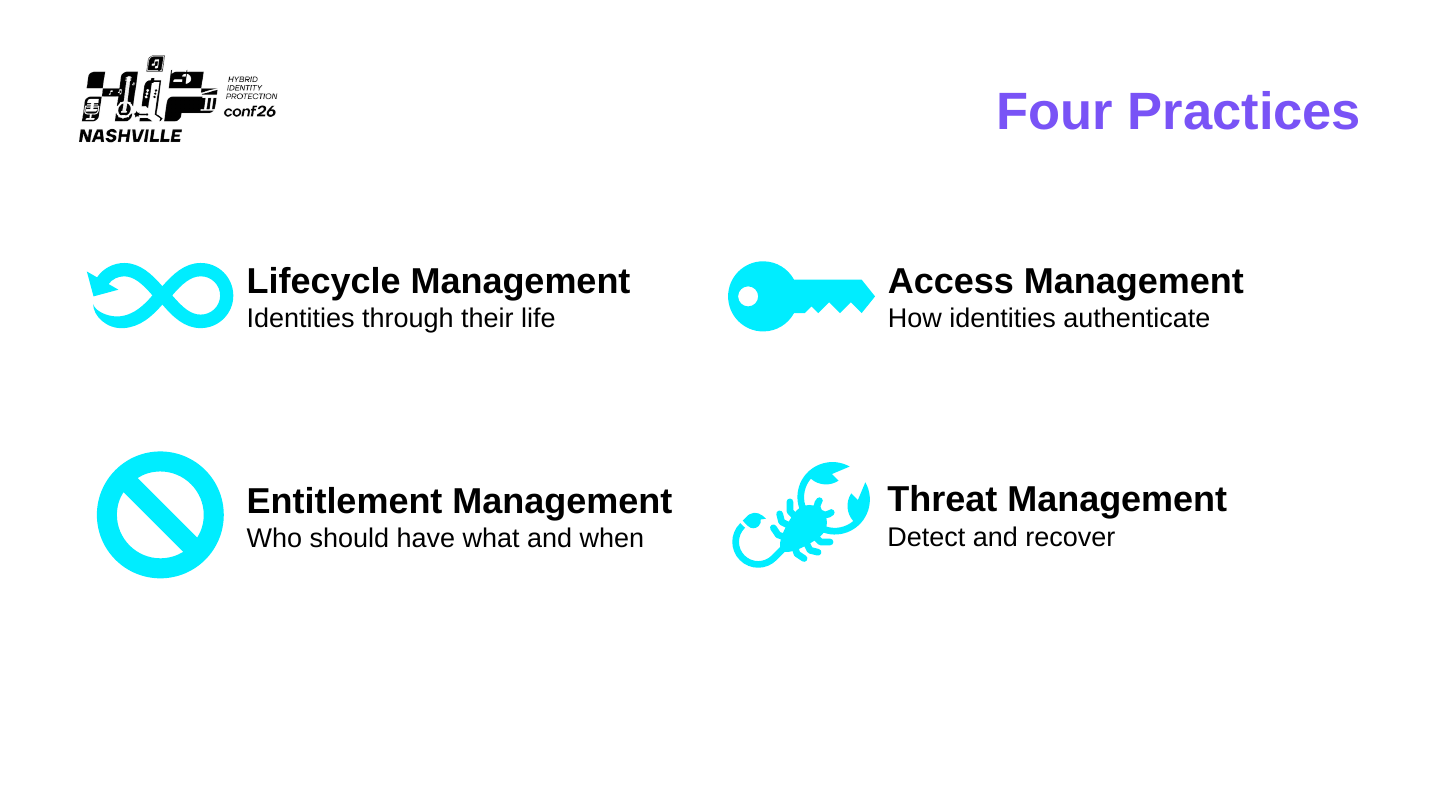
<p>The model groups the identity landscape into four practices: Lifecycle Management, Access Management, Entitlement Management, and Threat Management.</p>

<p><img src="https://raw.githubusercontent.com/soulemike/soulemike.github.io/refs/heads/main/assets/hybrid-identity-maturity/slide-36-four-practices.png" alt="Slide 36: Four Practices" /></p>

<p><em>Slide 36: The four practices cover the identity lifecycle, authentication, entitlement, and identity-aware detection and recovery.</em></p>

<h3 id="lifecycle-management">Lifecycle Management</h3>

<p>Lifecycle Management governs identities from creation to retirement. Its processes cover joiner, mover, and leaver workflows; credential issuance and rotation; and the lifecycle of human, service, and machine identities.</p>

<p>The progression on Slides 43 through 46 moves from manual tickets, shared credentials, and unmanaged machine identities toward event-driven provisioning, short-lived credentials, and lifecycle controls for every identity type. The outcome on Slide 46 is concrete: <strong>no orphaned access, and access always matches reality.</strong></p>

<p>A useful operational test is equally concrete: can you name the owner of every service account?</p>

<h3 id="access-management">Access Management</h3>

<p>Access Management controls how identities prove who they are. Slides 50 through 52 move protocols and authentication factors from legacy access and limited MFA toward conditional access, phishing-resistant authentication, passwordless methods, and continuous evaluation.</p>

<p>The outcome on Slide 52 is that every login is verified and credentials stop being the soft target. The first diagnostic question is straightforward: what still authenticates with a password alone?</p>

<h3 id="entitlement-management">Entitlement Management</h3>

<p>Entitlement Management governs who should have what, and when. Slides 56 through 59 cover access reviews, classification, and privileged access.</p>

<p>The progression moves from spreadsheet-driven reviews, undocumented sensitivity, and standing administrator rights toward continuous risk-prioritized certification, classification-driven access decisions, and just-in-time privilege. The outcome on Slide 59 is <strong>least privilege that holds</strong>, with no access lingering without a reason.</p>

<p>This is where the distinction between assigning least privilege and maintaining least privilege becomes operationally important. Access changes as people, systems, and business context change. The control has to keep up.</p>

<h3 id="threat-management">Threat Management</h3>

<p>Threat Management addresses identity-aware detection and incident preparedness. Slides 63 through 65 move from collected logs and generic policy toward correlated identity signals, automated response, session revocation, rehearsed playbooks, and tested recovery that includes tier-0 restoration.</p>

<p>The outcome on Slide 65 is fast detection and faster recovery. The practical maturity test is whether the organization has rehearsed identity recovery recently enough to know that the plan works.</p>

<p>Together, the four practices make maturity observable through changes in the operating environment. Ownership becomes clearer. Weak authentication disappears. Privilege becomes temporary. Recovery becomes rehearsed.</p>

<h2 id="sequence-is-part-of-the-risk-strategy">Sequence is part of the risk strategy</h2>

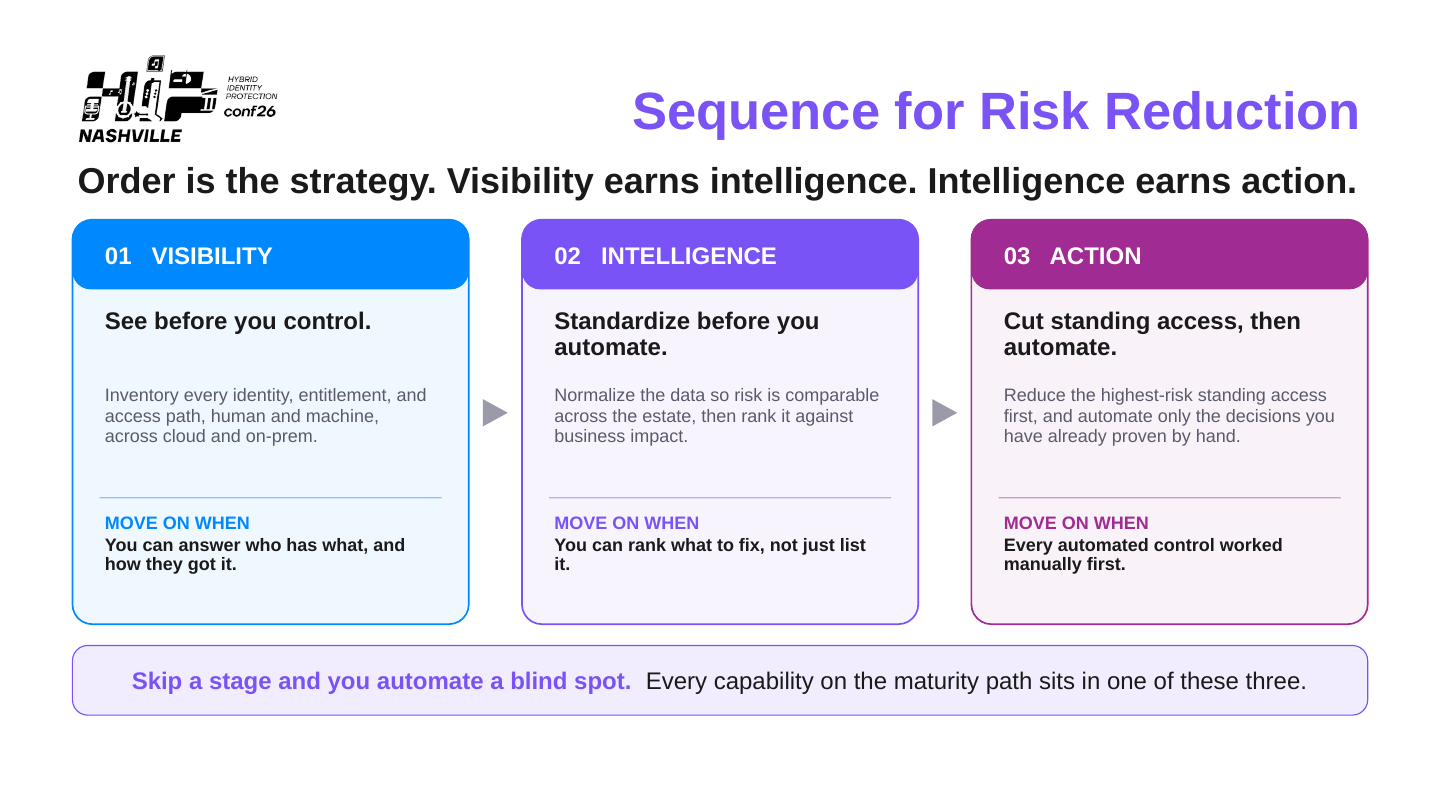
<p>The model’s roadmap uses three stages: visibility, intelligence, and action.</p>

<p>Visibility answers who has access, to what, and how they got it. Intelligence standardizes the data so risk can be compared and ranked against business impact. Action removes the highest-risk standing access and automates decisions that have already been proven manually.</p>

<p><img src="https://raw.githubusercontent.com/soulemike/soulemike.github.io/refs/heads/main/assets/hybrid-identity-maturity/slide-69-sequence.png" alt="Slide 69: Sequence for Risk Reduction" /></p>

<p><em>Slide 69: Visibility earns intelligence. Intelligence earns action. Skipping a stage risks automating a blind spot.</em></p>

<p>The order changes the economics of the program. Better visibility reduces time spent discovering what exists. Standardized intelligence improves prioritization. Proven decisions are safer to automate. Each step creates leverage for the next rather than adding another disconnected control.</p>

<h2 id="identity-risk-often-lives-in-the-seams-between-teams">Identity risk often lives in the seams between teams</h2>

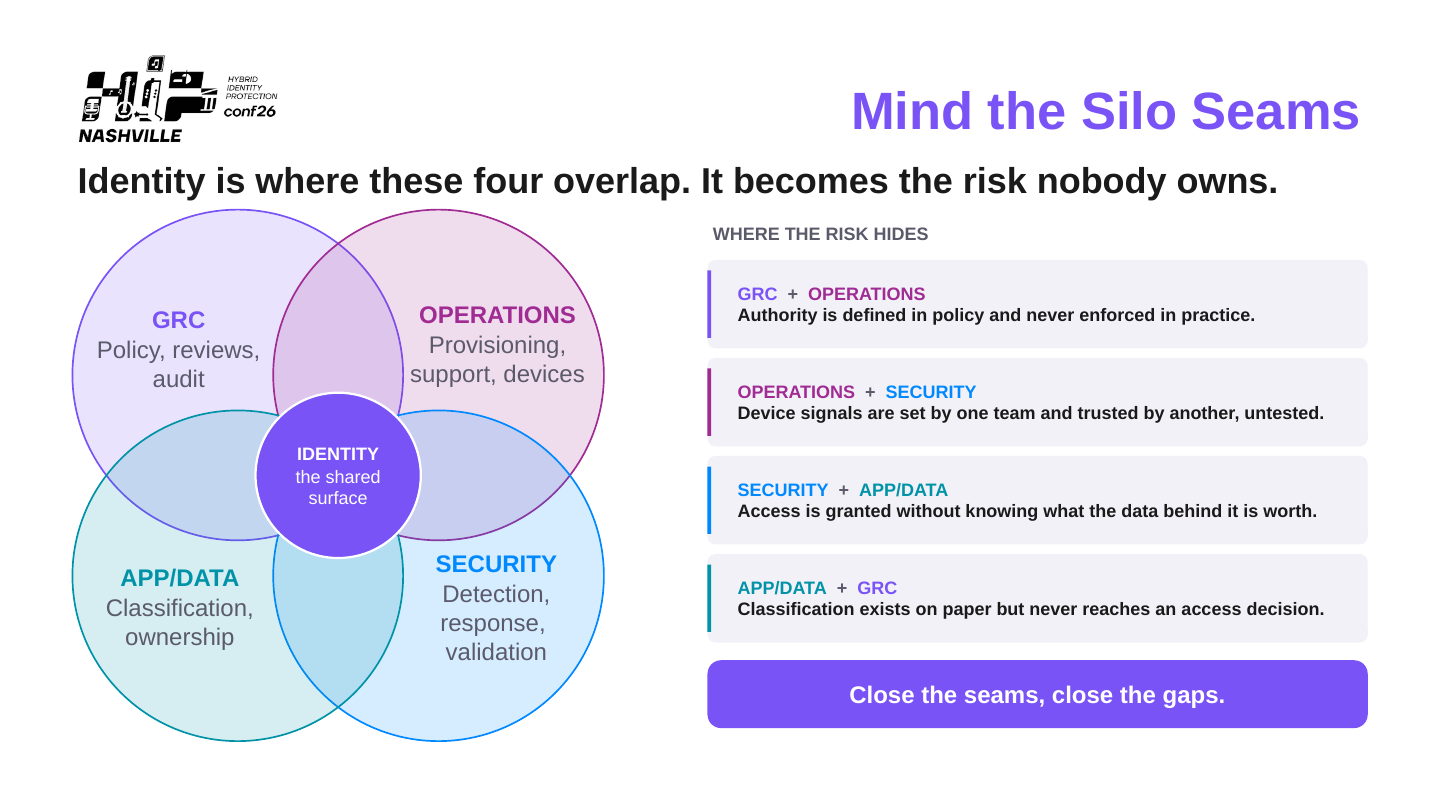
<p>Identity is a shared surface. GRC defines policy and review requirements. Operations provisions accounts and manages devices. Security detects abuse and responds. Application and data owners understand what the underlying systems are worth.</p>

<p>The failures often appear at the handoffs.</p>

<p>Slide 70 calls out several examples: policy authority that is never enforced in operations, device signals that one team produces and another trusts without validation, access granted without understanding the value of the data behind it, and classification that exists on paper but never reaches an access decision.</p>

<p><img src="https://raw.githubusercontent.com/soulemike/soulemike.github.io/refs/heads/main/assets/hybrid-identity-maturity/slide-70-silo-seams.png" alt="Slide 70: Mind the Silo Seams" /></p>

<p><em>Slide 70: Identity becomes the shared surface across GRC, operations, security, and application or data ownership. Unowned seams become control gaps.</em></p>

<p>This is an organizational design problem as much as a technical one. Mature identity programs need explicit ownership for the decisions that cross those boundaries, including who defines policy, who provides the signal, who validates it, and who is accountable when the signal is wrong.</p>

<h2 id="build-the-roadmap-around-the-next-risk-reducing-move">Build the roadmap around the next risk-reducing move</h2>

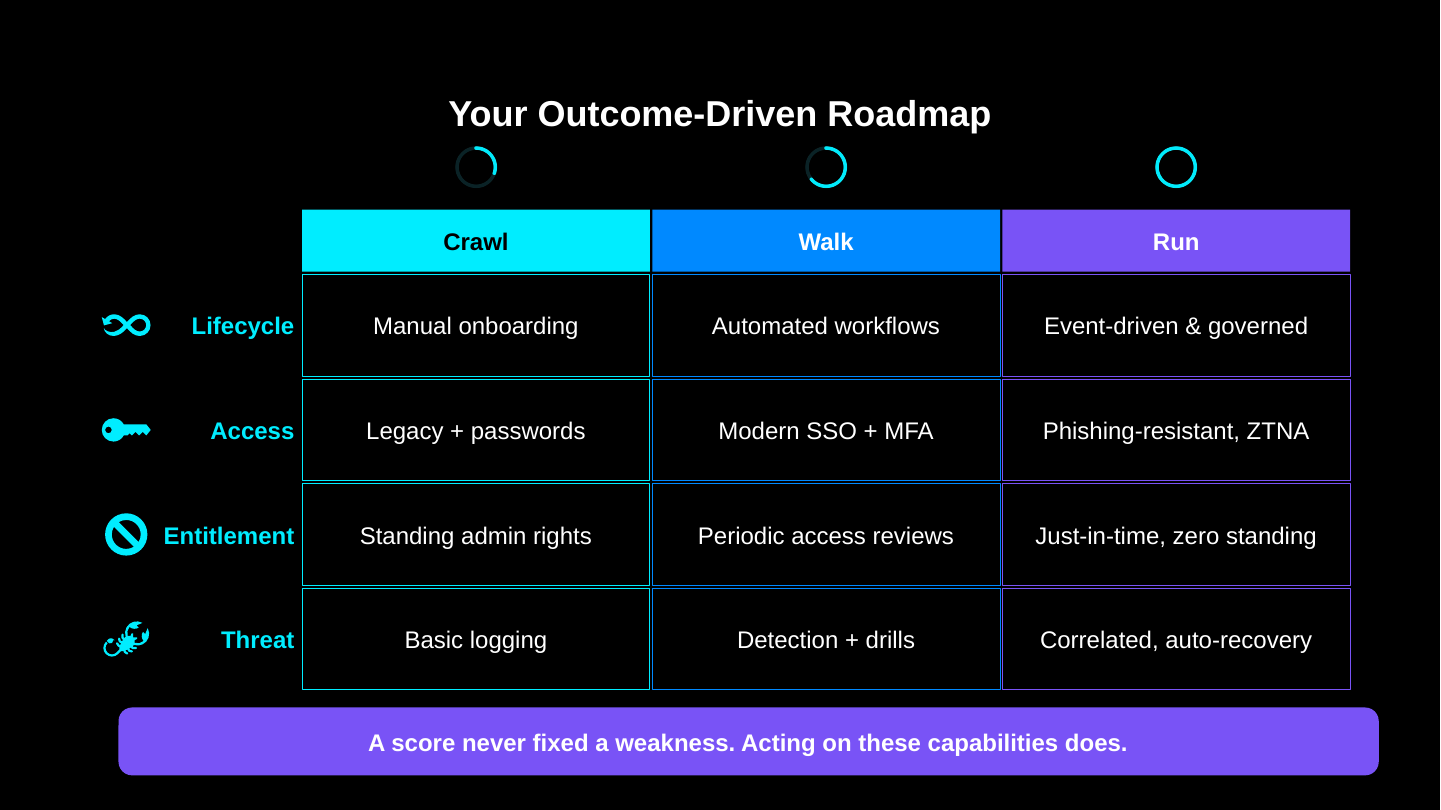
<p>Slide 71 consolidates the model into an outcome-driven roadmap across Crawl, Walk, and Run. The point is not to push every capability to Run at the same time. The roadmap helps identify the next capability that removes a meaningful weakness.</p>

<p><img src="https://raw.githubusercontent.com/soulemike/soulemike.github.io/refs/heads/main/assets/hybrid-identity-maturity/slide-71-roadmap.png" alt="Slide 71: Your Outcome-Driven Roadmap" /></p>

<p><em>Slide 71: The maturity model becomes a roadmap when each capability is tied to an observable security outcome.</em></p>

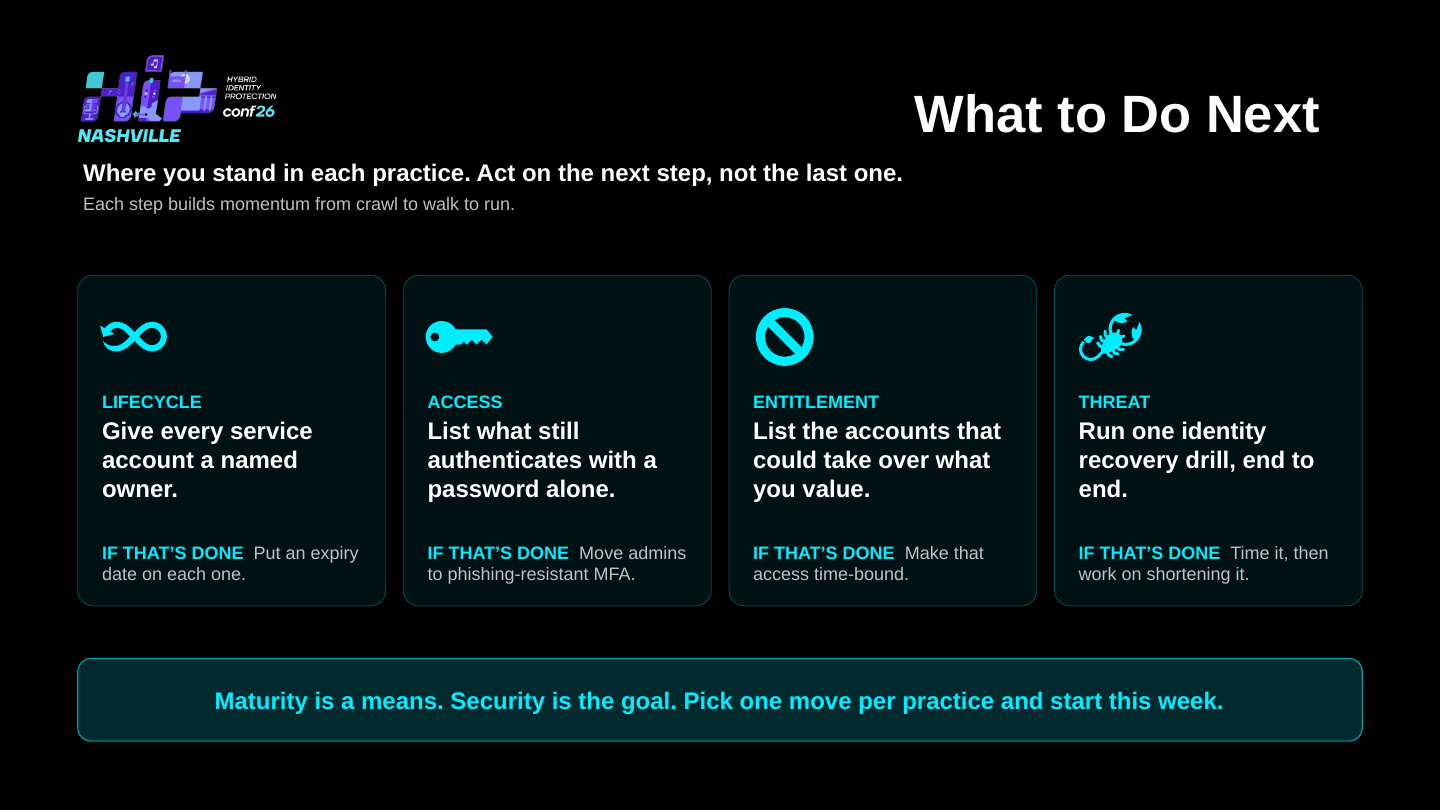
<p>Slide 72 turns that roadmap into four immediate actions:</p>

<table>
  <thead>
    <tr>
      <th>Practice</th>
      <th>Start here</th>
      <th>If that is already done</th>
    </tr>
  </thead>
  <tbody>
    <tr>
      <td>Lifecycle</td>
      <td>Give every service account a named owner.</td>
      <td>Put an expiry date on each one.</td>
    </tr>
    <tr>
      <td>Access</td>
      <td>List what still authenticates with a password alone.</td>
      <td>Move administrators to phishing-resistant MFA.</td>
    </tr>
    <tr>
      <td>Entitlement</td>
      <td>List the accounts that could take over what you value.</td>
      <td>Make that access time-bound.</td>
    </tr>
    <tr>
      <td>Threat</td>
      <td>Run one identity recovery drill end to end.</td>
      <td>Time it, then shorten it.</td>
    </tr>
  </tbody>
</table>

<p><img src="https://raw.githubusercontent.com/soulemike/soulemike.github.io/refs/heads/main/assets/hybrid-identity-maturity/slide-72-next.png" alt="Slide 72: What to Do Next" /></p>

<p><em>Slide 72: Pick one move per practice and create momentum from Crawl to Walk to Run.</em></p>

<h2 id="maturity-is-a-means-security-is-the-goal">Maturity is a means. Security is the goal.</h2>

<p>A useful maturity review should make a decision clearer. It should show which weaknesses were removed, which exposures became smaller, where control still depends on an exception, and which proven decisions are ready to automate.</p>

<p>The score can still exist. It becomes supporting evidence rather than the objective.</p>

<p>The harder question is also the more useful one: <strong>which line in your current identity maturity report would still matter if the product names and deployment percentages disappeared?</strong></p>]]></content><author><name>Mike Soule</name></author><category term="Other" /><summary type="html"><![CDATA[Summary blog for this presentation at HIP Conf 2026.]]></summary></entry><entry><title type="html">PowerShell and GRC: Moving from “Disable It” to “Manage It”</title><link href="http://log.noworseoff.com/2026/02/04/PowerShell-and-GRC.html" rel="alternate" type="text/html" title="PowerShell and GRC: Moving from “Disable It” to “Manage It”" /><published>2026-02-04T00:00:00+00:00</published><updated>2026-02-04T00:00:00+00:00</updated><id>http://log.noworseoff.com/2026/02/04/PowerShell-and-GRC</id><content type="html" xml:base="http://log.noworseoff.com/2026/02/04/PowerShell-and-GRC.html"><![CDATA[<p>For years, many security conversations have started with the idea that hackers use PowerShell so it should be disabled. In reality, PowerShell is an essential operations tool. The real task is to manage risk so that organizations can use PowerShell safely while preserving the automation and efficiency that teams depend on.</p>

<h2 id="the-myth-hackers-use-powershell-disable-it">The Myth: “Hackers Use PowerShell, Disable It”</h2>
<p>It is true that attackers abuse PowerShell. Disabling it entirely harms operational capability and often encourages workarounds that are even riskier. Mature organizations balance risks with benefits.</p>

<p><img alt="image" src="https://github.com/user-attachments/assets/50a3bb49-384f-4d9d-b83d-536758a6ad52" /></p>

<p><img alt="image" src="https://github.com/user-attachments/assets/4d432aec-703c-4489-9303-b3a8ff01f9c9" /></p>

<p><img alt="image" src="https://github.com/user-attachments/assets/a278bb9c-eb94-45e8-8622-fa526027e5d9" /></p>

<h2 id="how-adversaries-hide-understanding-obfuscation">How Adversaries Hide: Understanding Obfuscation</h2>
<p>Attackers commonly hide intent using hex encoding or other forms of obfuscation. By decoding these strings step by step, you uncover ordinary behavior concealed behind encoded data.</p>

<p><img alt="image" src="https://github.com/user-attachments/assets/a4855e5e-6c73-4df7-bb04-60ba782c5089" /></p>

<p><img alt="image" src="https://github.com/user-attachments/assets/22590c2d-c1b7-479a-b7d7-4f5f5543b7ea" /></p>

<p><img alt="image" src="https://github.com/user-attachments/assets/45467313-76d3-408e-8b24-9d346da04b33" /></p>

<p><img alt="image" src="https://github.com/user-attachments/assets/db4bd49c-349f-440b-8014-1a3436f3820e" /></p>

<h2 id="what-risk-really-means-and-how-grc-helps">What Risk Really Means and How GRC Helps</h2>
<p>Risk is a combination of probability and impact. GRC exists to ensure that organizations understand why a control is needed, what must be done, and what is actually happening.</p>

<p><img alt="image" src="https://github.com/user-attachments/assets/dbeddd47-bfc6-473e-beea-c9ace9896f7e" /></p>

<p><img alt="image" src="https://github.com/user-attachments/assets/bdb0df76-3739-40ed-b410-da3c00dd5fd7" /></p>

<p><img alt="image" src="https://github.com/user-attachments/assets/a462d3f6-953c-4360-98da-bb269a1dc8d1" /></p>

<h2 id="navigating-industry-frameworks-without-creating-new-ones">Navigating Industry Frameworks Without Creating New Ones</h2>
<p>Organizations operate within frameworks like ISO, COSO, FAIR, NIST, ITIL and COBIT. The goal is not to invent new standards but to apply existing ones consistently.</p>

<p><img alt="image" src="https://github.com/user-attachments/assets/c9dc8c5f-ebbe-4cbb-87c9-c4b7215e5e0b" /></p>

<p><img alt="image" src="https://github.com/user-attachments/assets/48ec82ec-de99-4c26-8df6-f70707ee217e" /></p>

<p><img alt="image" src="https://github.com/user-attachments/assets/97cf0ecc-db05-4a2f-9232-88947cfd7c4f" /></p>

<h2 id="is-powershell-really-the-issue">Is PowerShell Really the Issue</h2>
<p>MITRE ATT&amp;CK describes several techniques involving PowerShell misuse, such as T1059.001 and T1546.013.</p>

<p><img alt="image" src="https://github.com/user-attachments/assets/c5f475f2-49d6-4a2f-90b6-90344707833a" /></p>

<h2 id="practical-risk-mitigations-for-powershell">Practical Risk Mitigations for PowerShell</h2>
<ol>
  <li>Observability through logging and EDR</li>
  <li>Access governance with admin tiering and JEA</li>
  <li>Script signing and software restriction policies</li>
  <li>Inbound and outbound access control</li>
  <li>Secret management and AppSec testing</li>
</ol>

<p><img alt="image" src="https://github.com/user-attachments/assets/11c21f9d-4e59-41cf-924c-d6caf23d1cbf" /></p>

<h2 id="where-to-begin-high-value-controls">Where to Begin: High Value Controls</h2>
<p>Start with logging, EDR and remoting hygiene. Move next to script signing, admin tiering and software restrictions.</p>

<p><img alt="image" src="https://github.com/user-attachments/assets/aa1be504-b60e-486c-a7e0-bc263bc2987d" /></p>

<h2 id="a-simple-three-phase-approach">A Simple Three Phase Approach</h2>
<p>Phase 1: Observe and contain</p>

<p>Phase 2: Establish trust</p>

<p>Phase 3: Institutionalize controls</p>

<p><a href="https://www.cyber.gov.au/business-government/protecting-devices-systems/system-administration/securing-powershell-in-the-enterprise">ASD’s guidance</a> on this is a great starting point for applying these concepts.</p>

<h2 id="conclusion">Conclusion</h2>
<p>PowerShell is not inherently unsafe. The absence of proper governance is what creates risk. Managing PowerShell through GRC principles allows organizations to keep automation advantages while reducing attack surface.</p>]]></content><author><name>Mike Soule</name></author><category term="Other" /><summary type="html"><![CDATA[For years, many security conversations have started with the idea that hackers use PowerShell so it should be disabled. In reality, PowerShell is an essential operations tool. The real task is to manage risk so that organizations can use PowerShell safely while preserving the automation and efficiency that teams depend on. The Myth: “Hackers Use PowerShell, Disable It” It is true that attackers abuse PowerShell. Disabling it entirely harms operational capability and often encourages workarounds that are even riskier. Mature organizations balance risks with benefits.]]></summary></entry><entry><title type="html">Is M365 E5 Worth It?</title><link href="http://log.noworseoff.com/2025/12/01/Is-m365-e5-worth-it.html" rel="alternate" type="text/html" title="Is M365 E5 Worth It?" /><published>2025-12-01T00:00:00+00:00</published><updated>2025-12-01T00:00:00+00:00</updated><id>http://log.noworseoff.com/2025/12/01/Is-m365-e5-worth-it</id><content type="html" xml:base="http://log.noworseoff.com/2025/12/01/Is-m365-e5-worth-it.html"><![CDATA[<h2 id="post-1--original-url-httpswwwlinkedincompostsmikesoule_recently-i-presented-at-the-arizona-technology-activity-7384588958107787264-5ja9">Post 1 — Original URL: https://www.linkedin.com/posts/mikesoule_recently-i-presented-at-the-arizona-technology-activity-7384588958107787264-5JA9</h2>

<p><strong>Title:</strong> Recently I presented at the Arizona Technology Summit on Microsoft 365 E5.</p>

<p>We went through Is M365 E5 worth it?</p>

<p>The answer…</p>

<table>
  <tbody>
    <tr>
      <td>Yes—if you use it. E5 delivers real value when you adopt what you own…</td>
      <td>Mike Soule</td>
    </tr>
  </tbody>
</table>

<p>Recently I presented at the Arizona Technology Summit on Microsoft 365 E5.</p>

<p>We went through Is M365 E5 worth it?</p>

<p>The answer…</p>

<p>Yes—if you use it. E5 delivers real value when you adopt what you own and focus on security and productivity outcomes.
Do this next:</p>

<p>Know your situation: renewal coming, new capabilities available, and pressure to realize value.
Prioritize adoption: start with Identity and Security features.
If you’re buying 2+ add‑ons, consider bundling to reduce spend.</p>

<p><img alt="image" src="https://github.com/user-attachments/assets/6e0a2d62-fcaf-418c-bba9-71c5ddf66752" /></p>

<p><img alt="image" src="https://github.com/user-attachments/assets/5d18619f-5b22-4d88-bdff-ec8be6bc75cf" /></p>

<hr />

<h2 id="post-2--original-url-httpswwwlinkedincompostsmikesoule_last-week-i-shared-a-bit-about-a-recent-presentation-activity-7387129424611057667-ebiy">Post 2 — Original URL: https://www.linkedin.com/posts/mikesoule_last-week-i-shared-a-bit-about-a-recent-presentation-activity-7387129424611057667-EbIY</h2>

<table>
  <tbody>
    <tr>
      <td><strong>Title:</strong> Last week I shared a bit about a recent presentation, lets continue building on that. To understand if M365 E5 is worth the cost, we also covered from Microsoft&amp;#39;s perspective, what even is M365…</td>
      <td>Mike Soule</td>
    </tr>
  </tbody>
</table>

<p>Last week I shared a bit about a recent presentation, lets continue building on that. To understand if M365 E5 is worth the cost, we also covered from Microsoft’s perspective, what even is M365 E5.</p>

<p>M365 combines:</p>
<ul>
  <li>Microsoft 365 Commercial cloud</li>
  <li>Enterprise Mobility + Security (Entra &amp; Intune)</li>
  <li>the cloud portion of Windows</li>
  <li>per‑user services like Power BI, Security &amp; Compliance, Copilot, plus Exchange, SharePoint, and Teams</li>
</ul>

<p>It’s Microsoft’s “AI‑powered business and productivity platform.”</p>

<p>If you have these building blocks, are you actually using them? Let’s map capability to need for your organization.</p>

<p><img alt="image" src="https://github.com/user-attachments/assets/2d3ff6d2-a38f-4c71-8b52-64e6c8fd4e95" /></p>

<p><img alt="image" src="https://github.com/user-attachments/assets/2ef027da-a670-42ad-84ee-abeb3e10035a" /></p>

<hr />

<h2 id="post-3--original-url-httpswwwlinkedincompostsmikesoule_cost-is-always-the-most-complex-aspect-of-activity-7389662397206208512-v6nm">Post 3 — Original URL: https://www.linkedin.com/posts/mikesoule_cost-is-always-the-most-complex-aspect-of-activity-7389662397206208512-V6Nm</h2>

<p><strong>Title:</strong> Cost is always the most complex aspect of answering is M365 E5 worth it.</p>

<p>💰 A major component of understanding if the value is worth the cost is very specific to your organization.</p>

<table>
  <tbody>
    <tr>
      <td>List pricing…</td>
      <td>Mike Soule</td>
    </tr>
  </tbody>
</table>

<p>Cost is always the most complex aspect of answering is M365 E5 worth it.</p>

<p>💰 A major component of understanding if the value is worth the cost is very specific to your organization.</p>

<p>List pricing shows M365 E5 &amp; Teams = $721 per user/year, with notable savings vs. stacking separate add‑ons (e.g., O365 E5, E5 Security/Compliance, Defender, Power BI, Teams Phone).</p>

<p>ℹ️ Keep in mind: when you need multiple premium capabilities, bundle.</p>

<p>Do this next:</p>
<ul>
  <li>Compare your current a‑la‑carte stack to the M365 E5 bundle.</li>
  <li>Create 2-3 personas to right‑size licenses.</li>
  <li>Use renewal cycles to consolidate vendors.</li>
</ul>

<p>Want a quick ROI check? Reach out and we can model your mix.</p>

<p>Move from E3 to E5 by layering capabilities:</p>
<ul>
  <li>Access &amp; Endpoint management (Entra, Intune).</li>
  <li>Data labeling &amp; protection for documents and collaboration.</li>
  <li>Defender suite: EDR, CASB, UEBA; add Insider Risk and IGA/ILM as needed.</li>
</ul>

<p>🏆 Outcome: Better protection across identities, devices, data, and apps—plus BI, calling, and collaboration security.</p>

<p>Let’s sequence your rollout to deliver quick wins.</p>

<p><img alt="image" src="https://github.com/user-attachments/assets/1ca61bcf-8a23-4ead-b5e9-489c710dac74" /></p>

<hr />

<h2 id="post-4--original-url-httpswwwlinkedincompostsmikesoule_over-the-last-few-weeks-we-covered-a-lot-activity-7392202871469109248-i0iz">Post 4 — Original URL: https://www.linkedin.com/posts/mikesoule_over-the-last-few-weeks-we-covered-a-lot-activity-7392202871469109248-i0IZ</h2>

<p><strong>Title:</strong> Over the last few weeks we covered a lot about determining if M365 E5 is worth it.</p>

<p>Now we are in a major change period.</p>

<table>
  <tbody>
    <tr>
      <td>Enterprise Agreement volume level pricing changes this month. Use this window…</td>
      <td>Mike Soule</td>
    </tr>
  </tbody>
</table>

<p>Over the last few weeks we covered a lot about determining if M365 E5 is worth it.</p>

<p>Now we are in a major change period.</p>

<p>Enterprise Agreement volume level pricing changes this month. Use this window before your next renewal to optimize bundles and consolidate tools.</p>

<p>Work with our team at Sentinel Technologies to run targeted workshops (Modern Identity, Zero Trust, M365 Adoption) and leverage services for projects, managed support, and Defender operations.</p>

<p>Lets work together to help your organization realize the most value from M365, Microsoft, and more.</p>

<p><img alt="image" src="https://github.com/user-attachments/assets/b73a0f74-a64a-4cae-82dc-e63d20979cd1" /></p>

<p><img alt="image" src="https://github.com/user-attachments/assets/e541881d-8e94-44a7-886b-5bfa1adce077" /></p>

<p><img alt="image" src="https://github.com/user-attachments/assets/31d322c7-31b3-4840-bfe5-900eed76324d" /></p>]]></content><author><name>Mike Soule</name></author><category term="Other" /><summary type="html"><![CDATA[Post 1 — Original URL: https://www.linkedin.com/posts/mikesoule_recently-i-presented-at-the-arizona-technology-activity-7384588958107787264-5JA9]]></summary></entry><entry><title type="html">Kerberos Deep Dive for Administrators</title><link href="http://log.noworseoff.com/2025/11/30/Kerberos-Deep-Dive.html" rel="alternate" type="text/html" title="Kerberos Deep Dive for Administrators" /><published>2025-11-30T00:00:00+00:00</published><updated>2025-11-30T00:00:00+00:00</updated><id>http://log.noworseoff.com/2025/11/30/Kerberos-Deep-Dive</id><content type="html" xml:base="http://log.noworseoff.com/2025/11/30/Kerberos-Deep-Dive.html"><![CDATA[<h2 id="overview">Overview</h2>

<p>If you are anything like I am, everything in this post will be things you have done to solve specific problems, researched to understand the protocol standards definitions better, or reviewed content because of the security misconfiguration concerns, but there is so much noise around these topics that this will be your one reference for the different scenarios and outcomes regarding Kerberos delegation as an administrator. If you are looking for how the protocol works, the references provide details on that, to understand configuring and using the protocol read on.</p>

<blockquote>
  <p>Unless otherwise stated, assume any changes will be reversed after validation steps for the section.</p>
</blockquote>

<h2 id="prereqs">Prereqs</h2>

<h3 id="systems">Systems</h3>

<p>You can use the names or IP Addresses of your preference, but these are the references within screenshots or when names are mentioned.</p>

<ul>
  <li>Domain, test.com (172.17.0.4)</li>
  <li>2 servers, web1 (172.17.0.5)(Frontend), web2 (172.17.0.6)(Backend)</li>
  <li>Domain joined client, test2 (172.17.0.7)</li>
</ul>

<h3 id="install-iis-on-web1--web2">Install IIS on web1 &amp; web2</h3>

<ul>
  <li>IIS
    <ul>
      <li>Defaults</li>
      <li>Security &gt; Windows Authentication</li>
      <li>Application Development &gt; ASP.NET</li>
    </ul>
  </li>
</ul>

<h3 id="ad-objects">AD Objects</h3>

<ul>
  <li>misoule (Domain user)</li>
  <li>web1u (Example AppPool Identity)</li>
  <li>web1gmsa
    <ul>
      <li>Group
        <ul>
          <li>Web1 as member</li>
        </ul>
      </li>
      <li>Service Account (Example AppPool Identity)</li>
    </ul>
  </li>
</ul>

<p>If you have the web1gmsa group created with web1 as a member and you have a KDS Root Key then the following will create the gMSA object.</p>

<pre><code class="language-powershell">New-ADServiceAccount -Name "web1gmsa" -DNSHostName "web1gmsa.test.com" -PrincipalsAllowedToPrincipalsAllowedToRetrieveManagedPassword "web1gmsa"
</code></pre>

<h3 id="download-the-sample-pages-on-web1--web2">Download the sample pages on web1 &amp; web2</h3>

<p>These two webpages are what we will use through this post to validate how we are authenticating.</p>

<p>The WhoAmI page provides all the details for the current authentication on the specific server the page is accessed from.</p>

<pre><code class="language-powershell">Invoke-WebRequest https://raw.githubusercontent.com/aspnet/samples/refs/heads/main/samples/aspnet/Identity/CurrentUserInfoRetrieval/WhoAmI.aspx -OutFile C:\inetpub\wwwroot\WhoAmI.aspx
</code></pre>

<p>The ScrapperTest page provides an easy way to submit a request to the backend server from the frontend server.</p>

<pre><code class="language-powershell">Invoke-WebRequest https://raw.githubusercontent.com/aspnet/samples/refs/heads/main/samples/aspnet/Identity/CurrentUserInfoRetrieval/ScrapperTest.aspx -OutFile C:\inetpub\wwwroot\ScrapperTest.aspx
</code></pre>

<h3 id="event-log-filter-on-dc">Event log filter on DC</h3>

<p>You can use this to filter for successful Kerberos (Query ID 0 and 2) and NTLM (Query ID 1) authentications from the web servers</p>

<pre><code class="language-xpath">&lt;QueryList&gt;
  &lt;Query Id="0" Path="Security"&gt;
    &lt;Select Path="Security"&gt;
      *[System[(EventID=4624)]]
      and
      *[EventData[Data[@Name='IpAddress'] and (Data='172.17.0.5' or Data='172.17.0.6' or Data='172.17.0.7')]]
    &lt;/Select&gt;
  &lt;/Query&gt;
  &lt;Query Id="1" Path="Security"&gt;
    &lt;Select Path="Security"&gt;
      *[System[(EventID=4776)]]
      and
      *[EventData[Data[@Name='TargetUserName'] and (Data='misoule')]]
      and
      *[EventData[Data[@Name='Workstation'] and (Data='WEB1' or Data='WEB2' or Data='TEST2')]]
    &lt;/Select&gt;
  &lt;/Query&gt;
  &lt;Query Id="2" Path="Security"&gt;
    &lt;Select Path="Security"&gt;
      *[System[(EventID=4768) or (EventID=4769)]]
    &lt;/Select&gt;
  &lt;/Query&gt;
&lt;/QueryList&gt;
</code></pre>

<h2 id="kerberos-in-the-wild">Kerberos in the Wild</h2>

<p>At this point Kerberos should <em>just work</em>… right?</p>

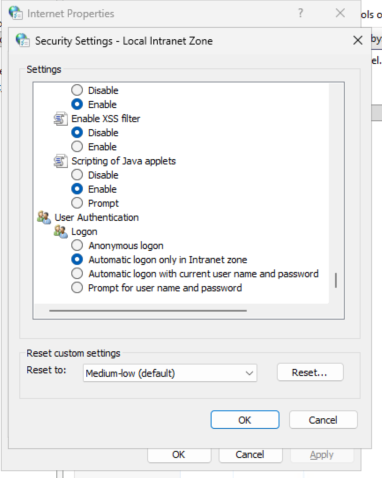
<p>It really depends on how you access the service though. Since we are using web pages for these requests, the Windows Internet Properties for Windows Integrated Authentication (WIA) will impact the experience.</p>

<h3 id="testing-with-wia">Testing with WIA</h3>

<ul>
  <li>From Edge on Web2
    <ul>
      <li>WIA SSOs
        <ul>
          <li>http://localhost/whoami.aspx</li>
        </ul>
      </li>
      <li>HTTP 401
        <ul>
          <li>http://127.0.0.1/whoami.aspx</li>
          <li>http://[::1]/whoami.aspx</li>
          <li>http://web2/whoami.aspx</li>
          <li>http://web2.test.com/whoami.aspx</li>
        </ul>
      </li>
    </ul>
  </li>
</ul>

<p>Why does this work? The Windows Internet Properties controls WIA’s credential passthrough.</p>

<p><img src="https://raw.githubusercontent.com/soulemike/soulemike.github.io/refs/heads/main/assets/kerberos-deep-dive/securitySettings.png" alt="Internet Properties" /></p>

<p>Any of these will allow WIA SSO (i.e., passthrough) by default.</p>

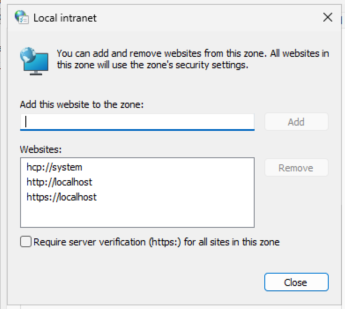
<p><img src="https://raw.githubusercontent.com/soulemike/soulemike.github.io/refs/heads/main/assets/kerberos-deep-dive/sites.png" alt="Local intranet" /></p>

<p>You can add one of the other examples, such as http://127.0.0.1/ to the Local intranet zone sites.</p>

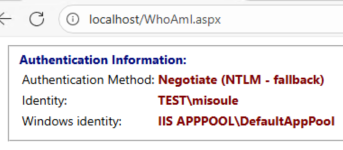
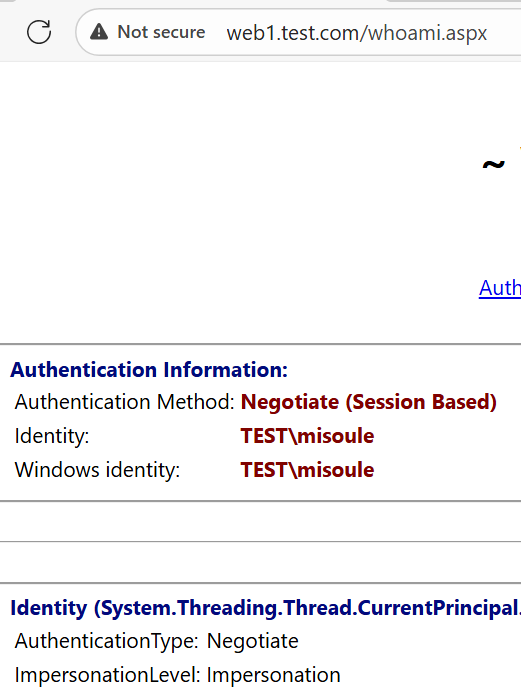
<p>You can also disable this passthrough to see localhost fallback to NTLM. Because <strong>Kerberos NEEDS DNS</strong>.</p>

<p><img src="https://raw.githubusercontent.com/soulemike/soulemike.github.io/refs/heads/main/assets/kerberos-deep-dive/localhostNtlm-1.png" alt="Localhost NTLM demonstration" /></p>

<p>If you complete the credential prompt or allow the passthrough to work you should see the following:</p>

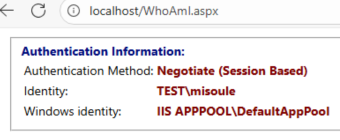
<p>Localhost will show <em>Negotiate (Session Based)</em></p>

<p><img src="https://raw.githubusercontent.com/soulemike/soulemike.github.io/refs/heads/main/assets/kerberos-deep-dive/localhostSession-1.png" alt="Localhost demonstration" /></p>

<blockquote>
  <p>Session Based means that an authentication already occurred and was not necessary for the current load. For Localhost it will always be session based unless you disable passthrough authentication. To clear sessions, you can restart your browser or the IIS Server. You can disable sessions, https://techcommunity.microsoft.com/blog/iis-support-blog/request-based-versus-session-based-kerberos-authentication-or-the-authpersistnon/916043</p>
</blockquote>

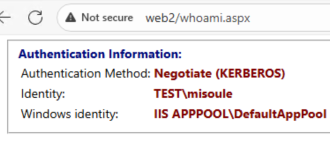
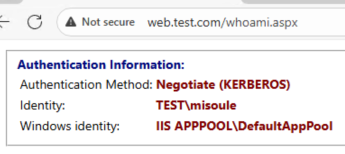
<p>Short DNS and FQDN will show <em>Negotiate (KERBEROS)</em></p>

<p><img src="https://raw.githubusercontent.com/soulemike/soulemike.github.io/refs/heads/main/assets/kerberos-deep-dive/shortDnsKerb-1.png" alt="Short DNS demonstration" /></p>

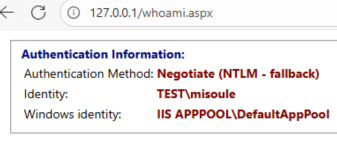
<p>Either IPv6 or IPv4 will show <em>Negotiate (NTLM - fallback)</em></p>

<p><img src="https://raw.githubusercontent.com/soulemike/soulemike.github.io/refs/heads/main/assets/kerberos-deep-dive/ipNtlm-1.png" alt="IP Address demonstration" /></p>

<p>A good reminder, <strong>Kerberos requires DNS</strong>.</p>

<p>If we put a CNAME record in front of Web2 Kerberos works fine.</p>

<p><img src="https://raw.githubusercontent.com/soulemike/soulemike.github.io/refs/heads/main/assets/kerberos-deep-dive/cname-1.png" alt="Using a CNAME" /></p>

<p>But if we use an A record authentication is not successful, because <strong>Kerberos NEEDS DNS</strong>.</p>

<p><img src="https://raw.githubusercontent.com/soulemike/soulemike.github.io/refs/heads/main/assets/kerberos-deep-dive/a-1.png" alt="Using an A record" /></p>

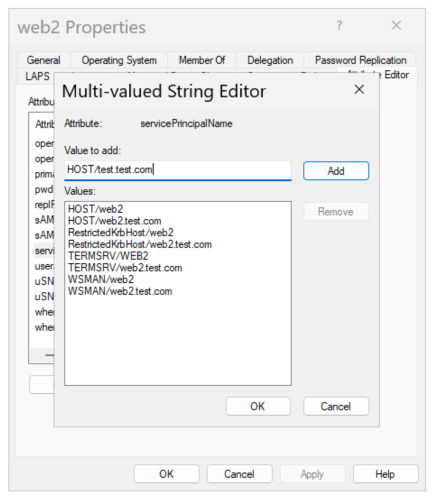
<p>If we add an SPN for our new A record then Kerberos can succeed.</p>

<p><img src="https://raw.githubusercontent.com/soulemike/soulemike.github.io/refs/heads/main/assets/kerberos-deep-dive/spn-1.png" alt="Adding the SPN" /></p>

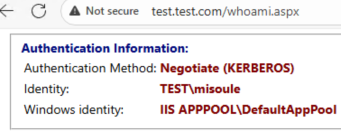
<p>Now Kerberos is successful for our new A record.</p>

<p><img src="https://raw.githubusercontent.com/soulemike/soulemike.github.io/refs/heads/main/assets/kerberos-deep-dive/a-2.png" alt="Using a functioning A record" /></p>

<blockquote>
  <p>What does the HOST portion of an SPN entail… Why should you use that instead of a specific service name…</p>

  <p>Use this PowerShell command to via what SPN service classes the HOST class aliases for:</p>

  <pre><code class="language-Powershell">Get-ADObject "CN=Directory Service,CN=Windows NT,CN=Services,CN=Configuration,DC=test,DC=com" -Properties spnmappings|% spnmappings 
</code></pre>

  <p>When I have discussed this with engineers at Microsoft, the guidance is to use HOST whenever you may be representing one of the aliased services. The intent is to make it easier to identify duplicated SPNs.</p>

  <p><strong>Spoiler alert…</strong> We are going to ignore this good practice to keep it simple and not require cleaning up the default HOST records for our computer objects.</p>
</blockquote>

<p>What we need for Kerberos to work before getting into delegation:</p>
<ul>
  <li>The server, web2, MUST be domain joined</li>
  <li>The user, misoule, MUST be a domain user</li>
  <li>The server, web2, MUST have DNS records registered
    <ul>
      <li>Those DNS records MUST have corresponding SPNs on the object running the service</li>
    </ul>
  </li>
</ul>

<h3 id="dc-logs">DC Logs</h3>

<p>Here are some example log events:</p>

<p>A successful Kerberos authentication event on the DC.</p>

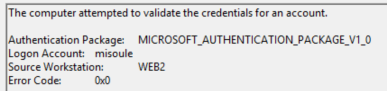
<p><img src="https://raw.githubusercontent.com/soulemike/soulemike.github.io/refs/heads/main/assets/kerberos-deep-dive/kerbEvent-1.png" alt="Kerberos Event Log" /></p>

<p>A successful NTLM authentication event on the DC.</p>

<p><img src="https://raw.githubusercontent.com/soulemike/soulemike.github.io/refs/heads/main/assets/kerberos-deep-dive/ntlmEvent-1.png" alt="NTLM Event Log" /></p>

<h3 id="between-servers">Between Servers</h3>

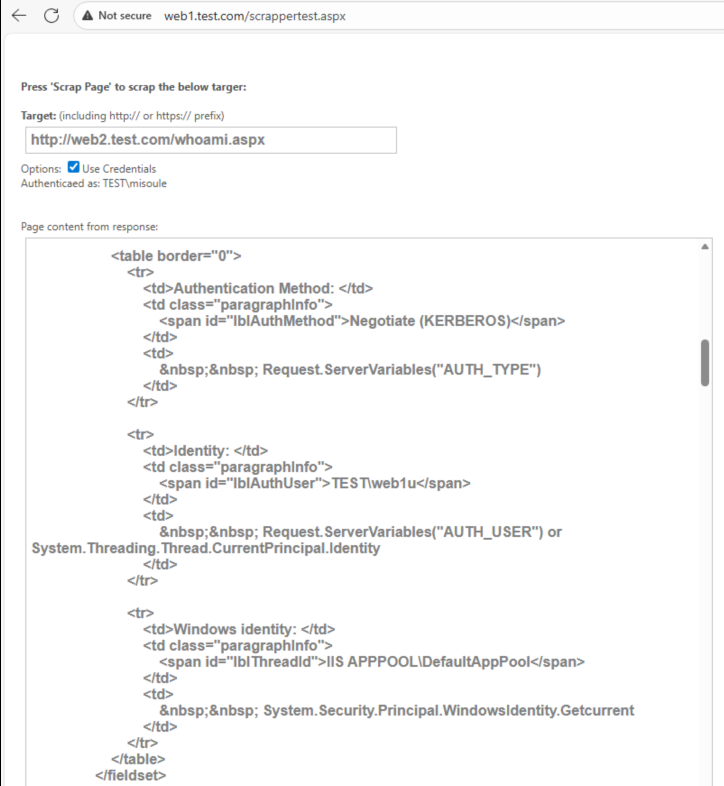
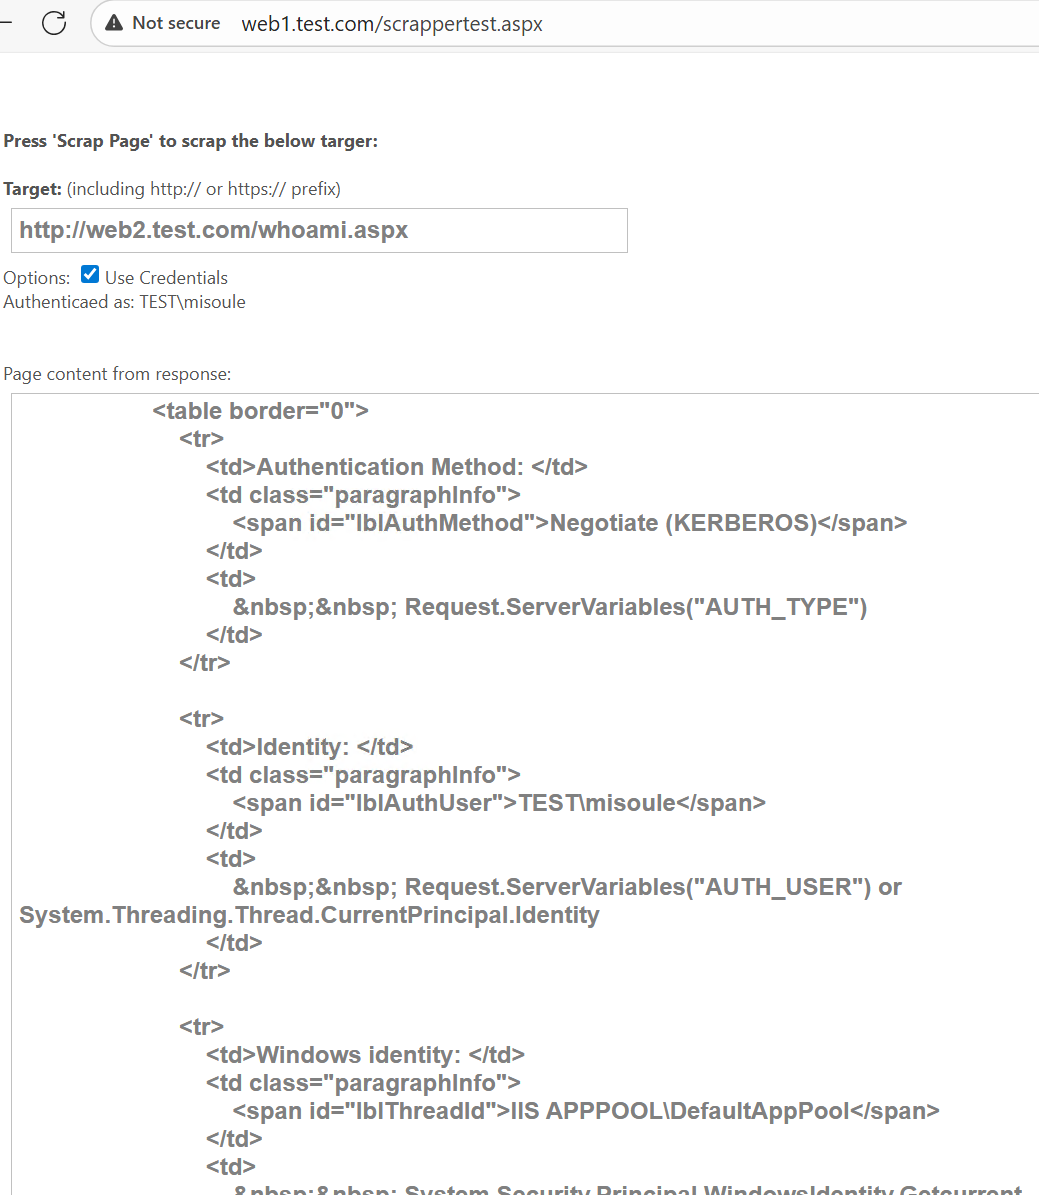
<p>You can use the scrappertest.aspx page to perform a request from web1 to web2.</p>

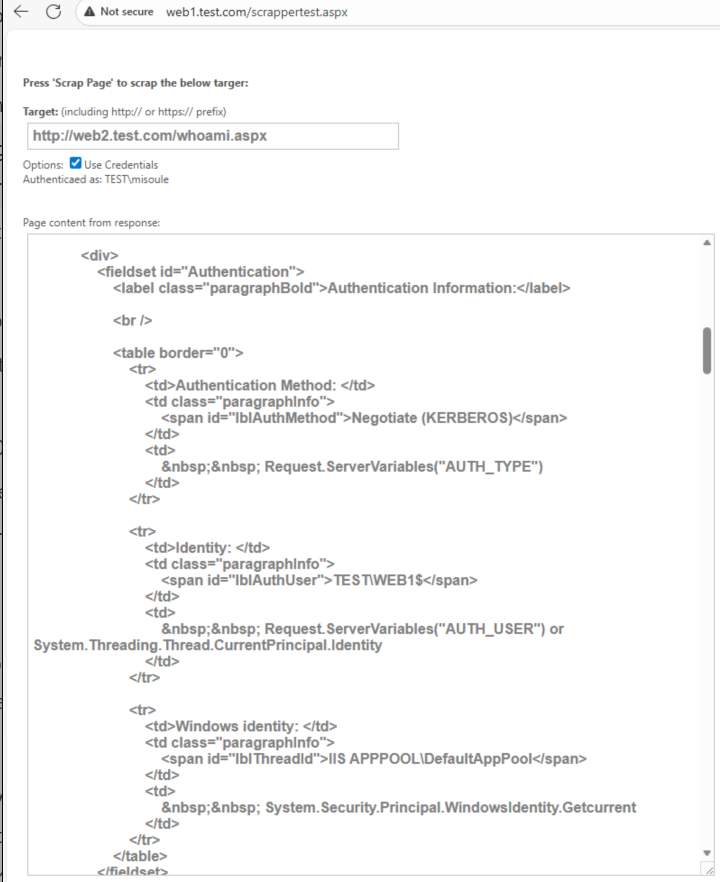
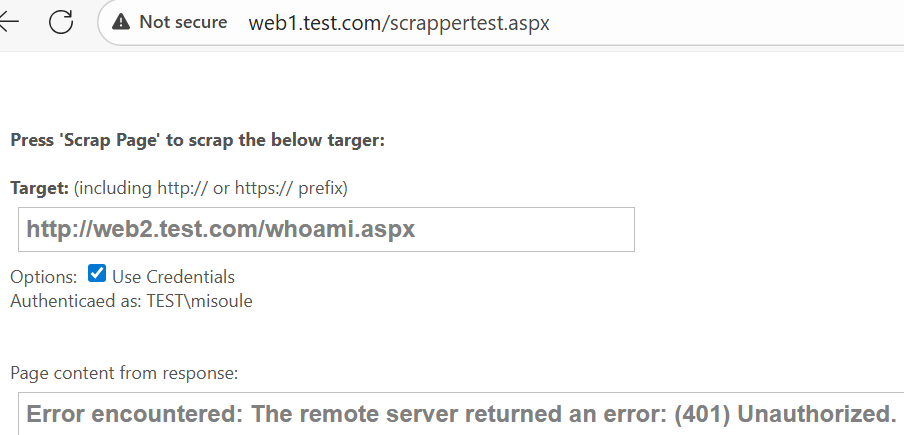
<p><img src="https://raw.githubusercontent.com/soulemike/soulemike.github.io/refs/heads/main/assets/kerberos-deep-dive/scrape-1.png" alt="Web1 to Web2" /></p>

<p>But Web2 says that the Web1 computer account is what logged in!</p>

<p>As we established Web2 Kerberos can be successful with credentials presented to it. Web1 is running the IIS AppPool as the DefaultAppPool, which is a virtual identity for local system. Meaning that currently Web1 is presenting it’s own system credentials when prompted to authenticate to Web2. Meaning at this point there is no delegation…</p>

<h2 id="iis-apppools--impersonation">IIS AppPools &amp; Impersonation</h2>

<blockquote>
  <p>Do not reset this section. We will use the end state going forward.</p>
</blockquote>

<h3 id="apppools">AppPools</h3>

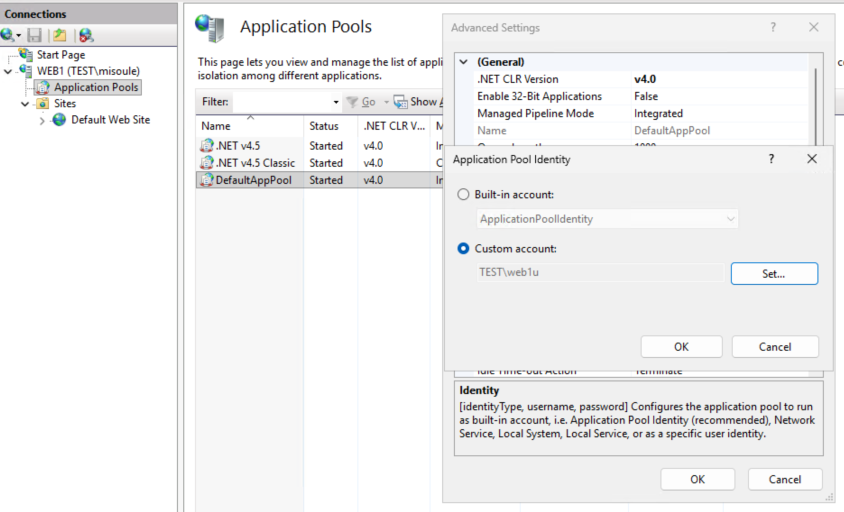
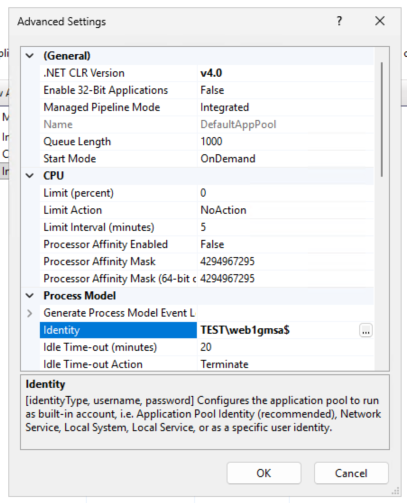
<p>Lets change our AppPool identities. Just using a user account to start:</p>

<p><img src="https://raw.githubusercontent.com/soulemike/soulemike.github.io/refs/heads/main/assets/kerberos-deep-dive/appPool-1.png" alt="Setting DefaultAppPool to use web1u" /></p>

<p>Now Web1 is presenting the web1u credentials to web2.</p>

<p><img src="https://raw.githubusercontent.com/soulemike/soulemike.github.io/refs/heads/main/assets/kerberos-deep-dive/scrape-2.png" alt="Web1 to Web2 as Web1u" /></p>

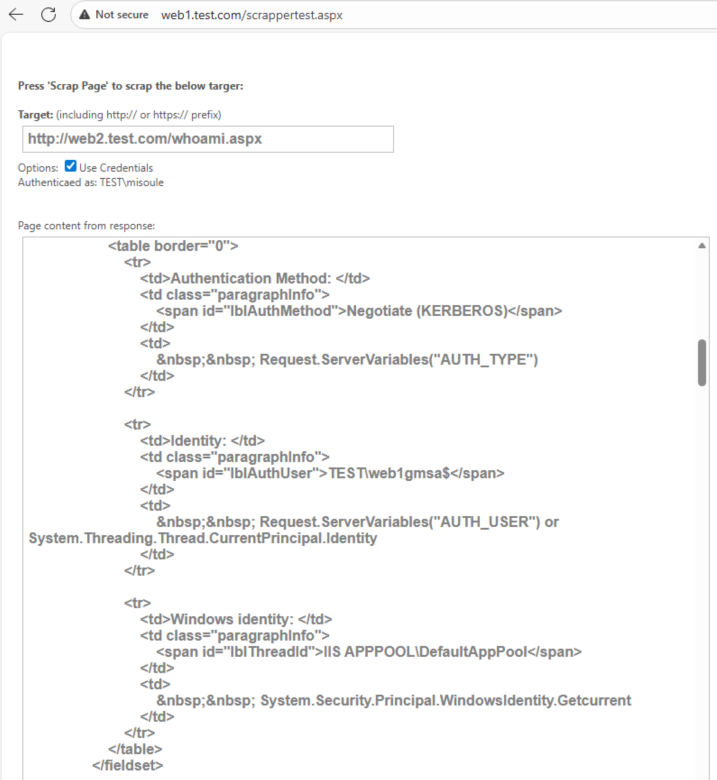
<p>But using a user object as a service account will lead to headaches. Lets use that fancy gMSA we have.</p>

<p><img src="https://raw.githubusercontent.com/soulemike/soulemike.github.io/refs/heads/main/assets/kerberos-deep-dive/gmsa.png" alt="AppPool as gMSA" /></p>

<p>Now Web1 is presenting the web1gmsa credentials to web2. But this still isn’t delegation…</p>

<p><img src="https://raw.githubusercontent.com/soulemike/soulemike.github.io/refs/heads/main/assets/kerberos-deep-dive/scrape-3.png" alt="Web1 to Web2 as Web1gmsa" /></p>

<h3 id="impersonation">Impersonation</h3>

<p>Are we ready for delegation yet? Yes, but first…</p>

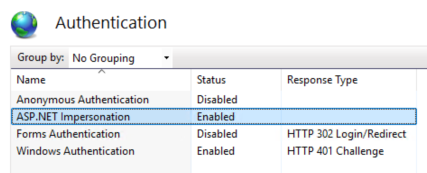
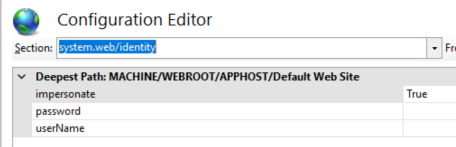
<p>We need to enable impersonation on the server. Allowing the AppPool to run in the context of the user.</p>

<p><img src="https://raw.githubusercontent.com/soulemike/soulemike.github.io/refs/heads/main/assets/kerberos-deep-dive/aspImpersonation.png" alt="Enable ASP.NET Impersonation" /></p>

<p>This should also enable impersonation on the web config as well.</p>

<p><img src="https://raw.githubusercontent.com/soulemike/soulemike.github.io/refs/heads/main/assets/kerberos-deep-dive/serverImpersonation.png" alt="Server Impersonation" /></p>

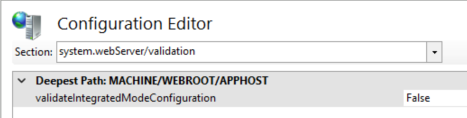
<p>You may also need to disable integrated mode validation.</p>

<p><img src="https://raw.githubusercontent.com/soulemike/soulemike.github.io/refs/heads/main/assets/kerberos-deep-dive/validation.png" alt="Disable Integrated Mode Validation" /></p>

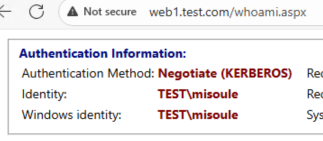
<p>Now on Web1 we can see that our Windows identity updated.</p>

<p><img src="https://raw.githubusercontent.com/soulemike/soulemike.github.io/refs/heads/main/assets/kerberos-deep-dive/winId.png" alt="Current User for Windows Identity" /></p>

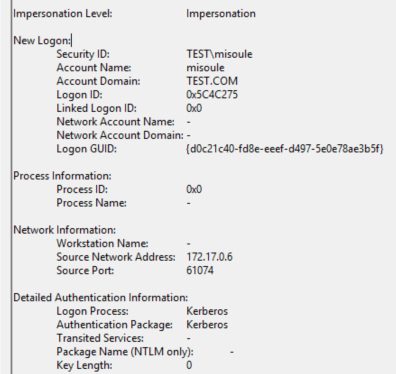
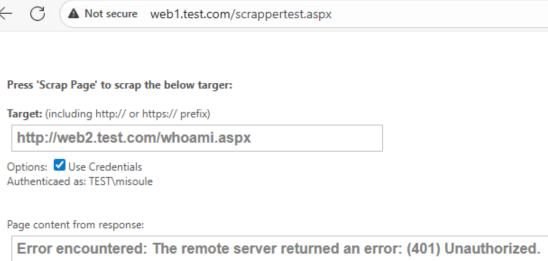
<p>But if we try to access Web2… We get a 401 error. This is because Web1 (inclusive of web1u, local mahcine, or web1gmsa) does not have the actual credentials, it only has the Kerberos ticket that authenticated misoule into Web1. This is a good example of the “double hop” problem. Web2 does not have the user credentials and neither does Web1. Unless the ticket issued for Web1 supports Kerberos delegation, or the frontend, Web1, can present the authentication prompt from Web2 then authentication will always fail.</p>

<p><img src="https://raw.githubusercontent.com/soulemike/soulemike.github.io/refs/heads/main/assets/kerberos-deep-dive/doubleHop.png" alt="401 for Double Hop Authentication" /></p>

<h2 id="unconstrained-delegation">Unconstrained Delegation</h2>

<blockquote>
  <p><strong>PLEASE DO NOT DO THIS</strong></p>

  <p>As you will see, modern systems block this by default for good reason, and it is arguably more difficult to make work than constrained delegation options.</p>
</blockquote>

<h3 id="summary">Summary</h3>

<p>In simple terms: “Allow <strong>this account</strong> to use their tickets <strong>ANYWHERE</strong> in the domain.”</p>

<p>These steps are necessary:</p>
<ul>
  <li>On the Domain Objects:
    <ul>
      <li>Allow delegation for the account, web1gmsa, that the app is running under.</li>
      <li>Add an SPN to the account, web1gmsa, for the service, web1.</li>
    </ul>
  </li>
  <li>On Web1:
    <ul>
      <li>Configure IIS to use the app pool credentials to work with the Kerberos tickets in kernel-mode rather than the machine account.</li>
    </ul>
  </li>
  <li>On the client:
    <ul>
      <li>Disable Credential Guard.</li>
      <li>Allow unconstrained delegation in Edge.</li>
    </ul>
  </li>
</ul>

<h3 id="ad-objects-1">AD Objects</h3>

<p>This is the part that is covered most often. The account that the service, in our case the IIS AppPool, is running as, for us this is using the web1gmsa$ gMSA account. This could also be the computer account or a normal user account depending on the IIS AppPool configuration. Configure the service account domain object:</p>

<pre><code class="language-powershell">$web1gmsaSplat = @{
  Identity = "web1gmsa$"
  ServicePrincipalNames = @{
    Add = "HTTP/web1.test.com"
  }
  TrustedForDelegation = $true
}

Set-ADServiceAccount @web1gmsaSplat
</code></pre>

<h3 id="iis-server">IIS Server</h3>

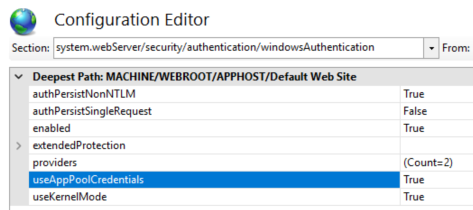
<p>Next our IIS server configuration, on our web1 server, needs to allow the AppPool, as our AppPool identity web1gmsa, to work with Local Security Authority (LSA) rather than the local machine. This is done by setting the IIS configuration flag <code>useAppPoolCredentials</code> to True.</p>

<p><img src="https://raw.githubusercontent.com/soulemike/soulemike.github.io/refs/heads/main/assets/kerberos-deep-dive/useAppPoolCreds.png" alt="IIS useAppPoolCredentials" /></p>

<h3 id="client">Client</h3>

<blockquote>
  <p><strong>Again, please do NOT do this!</strong></p>

  <p>Starting in Windows 11, 22H2 and Windows Server 2025, Credential Guard is enabled by default on devices which meet the requirements.</p>
</blockquote>

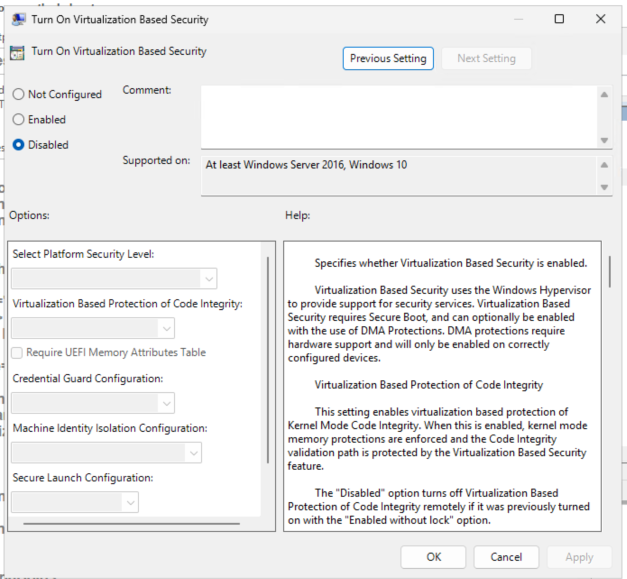
<p>To allow unconstrained delegation the client requires Credential Guard to be disabled. You can disable the feature using the registry or group policy.</p>

<p><img src="https://raw.githubusercontent.com/soulemike/soulemike.github.io/refs/heads/main/assets/kerberos-deep-dive/disableCredGuard.png" alt="Disable Credential Guard" /></p>

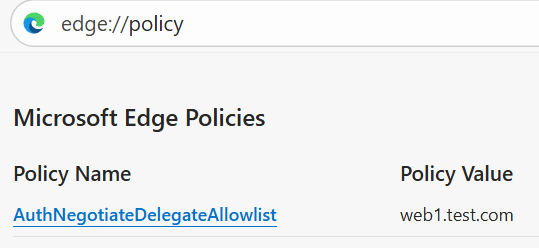
<p>Additionally, Edge will block unconstrained delegation. You can disable this feature using the registry or group policy as well. Configure this to allow your web server, web1, as part of the allow list.</p>

<blockquote>
  <p>Modern browsers such as Microsoft Edge version 87 or above</p>
</blockquote>

<pre><code class="language-Powershell">New-Item -Path "HKLM:\SOFTWARE\Policies\Microsoft\Edge"
New-ItemProperty -Path "HKLM:\SOFTWARE\Policies\Microsoft\Edge" -Name "AuthNegotiateDelegateAllowlist" -Value "web1.test.com"
</code></pre>

<p><img src="https://raw.githubusercontent.com/soulemike/soulemike.github.io/refs/heads/main/assets/kerberos-deep-dive/edgePolicy.png" alt="Edge AuthNegotiateDelegateAllowlost" /></p>

<h3 id="testing">Testing</h3>

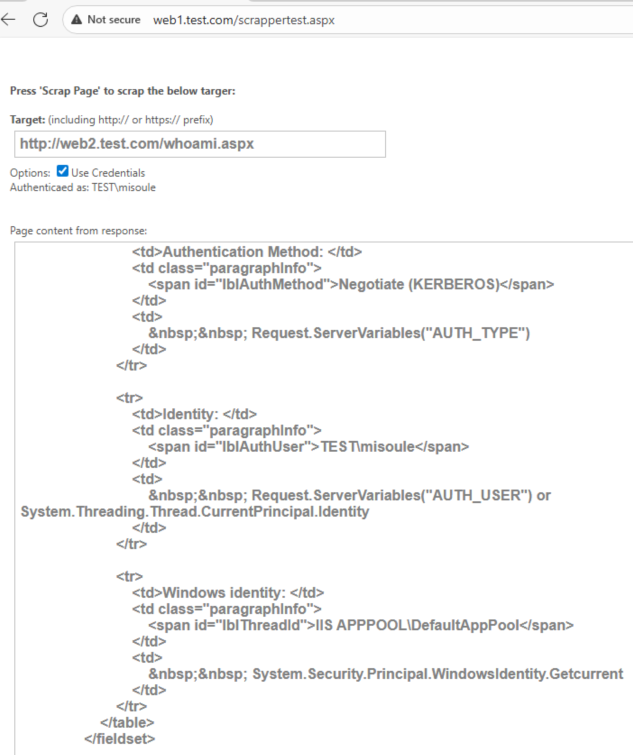
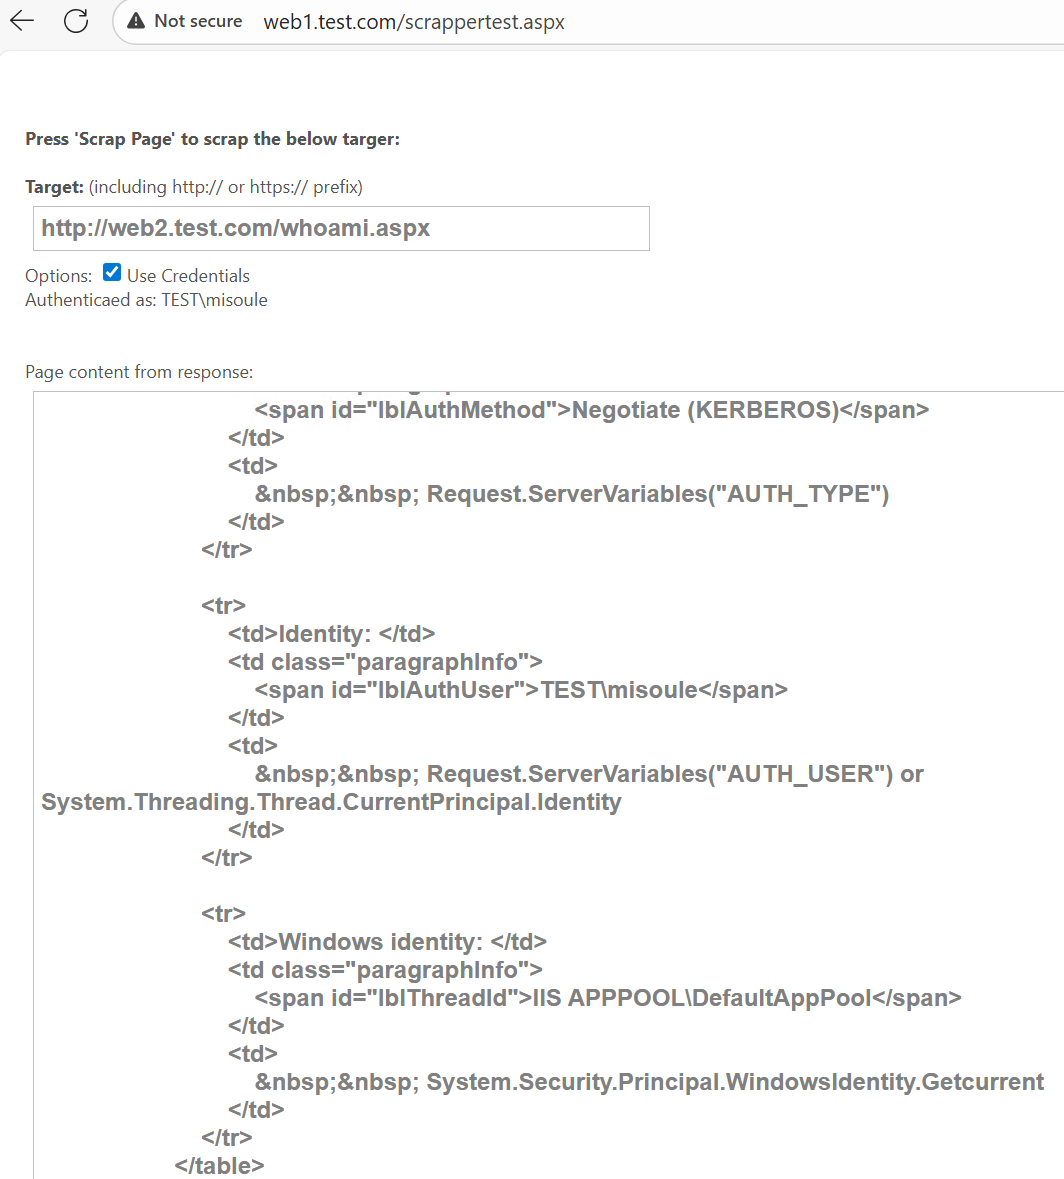
<p>Now we can validate that we can authenticate to web2 as the user:</p>

<p><img src="https://raw.githubusercontent.com/soulemike/soulemike.github.io/refs/heads/main/assets/kerberos-deep-dive/success-1.png" alt="Successful" /></p>

<p>On the client system we can also run <code>klist</code> to validate the Kerberos ticket has the <code>ok_as_delegate</code> flag:</p>

<p><img src="https://raw.githubusercontent.com/soulemike/soulemike.github.io/refs/heads/main/assets/kerberos-deep-dive/klist-1.png" alt="Kerberos ticket" /></p>

<h4 id="validating-using-event-log">Validating using Event Log</h4>

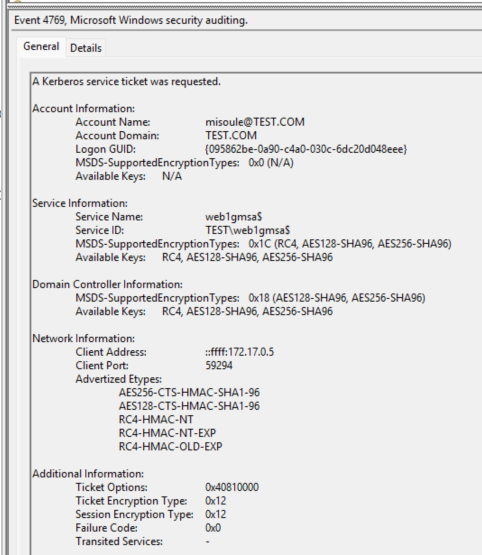
<p>Example of the Ticket Granting Service (TGS) ticket request corelating Web1 and newDC logs:</p>

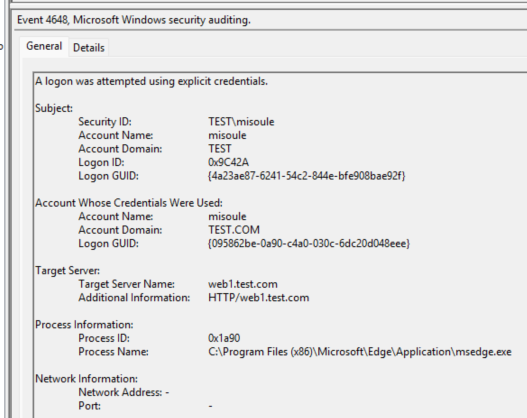
<p>Logon GUID: {095862be-0a90-c4a0-030c-6dc20d048eee}</p>

<h5 id="event-on-the-client">Event On the client</h5>

<p><img src="https://raw.githubusercontent.com/soulemike/soulemike.github.io/refs/heads/main/assets/kerberos-deep-dive/4648.png" alt="Request" /></p>

<h5 id="event-on-the-domain-controllers">Event On the domain controllers</h5>

<p><img src="https://raw.githubusercontent.com/soulemike/soulemike.github.io/refs/heads/main/assets/kerberos-deep-dive/4769.png" alt="TGS" /></p>

<h4 id="common-issues">Common Issues</h4>

<p>If you get endless HTTP 401 prompts on the client:</p>
<ul>
  <li>The SPN may not be set correctly.</li>
  <li>The IIS configuration useAppPoolCredentials may not be set correctly.</li>
</ul>

<p>If the whoami page shows impersonation level impersonation rather than delegation:</p>
<ul>
  <li>The AppPool identity may not be set as TrustedForDelegation.</li>
  <li>Edge may not have the server in AuthNegotiateDelegateAllowlist.</li>
  <li>Credential Guard may be enabled on the client.</li>
</ul>

<h2 id="kerberos-constrained-delegation">Kerberos Constrained Delegation</h2>

<h3 id="summary-1">Summary</h3>

<p>In simple terms: “Allow <strong>this account</strong> to request tickets for <strong>these services</strong> on behalf of a user.”</p>

<blockquote>
  <p>Don’t forget to reset everything</p>
</blockquote>

<p>These steps are necessary:</p>
<ul>
  <li>On the Domain Objects:
    <ul>
      <li>Allow delegation for the account, web1gmsa, that the app is running under to the backend SPN, web2.</li>
      <li>Add an SPN to the account, web1gmsa, for the service, web1.</li>
    </ul>
  </li>
  <li>On Web1:
    <ul>
      <li>Configure IIS to use the app pool credentials to work with the Kerberos tickets in kernel-mode rather than the machine account.</li>
    </ul>
  </li>
</ul>

<h3 id="ad-objects-2">AD Objects</h3>

<p>The account that the service, in our case the IIS AppPool, is running as, for us this is using the web1gmsa$ gMSA account. This could also be the computer account or a normal user account depending on the IIS AppPool configuration. Configure the service account domain object:</p>

<pre><code class="language-powershell">$web1gmsaSplat = @{
  Identity = "web1gmsa$"
  ServicePrincipalNames = @{
    Add = "HTTP/web1.test.com"
  }
  Add = @{
    "msDs-AllowedToDelegateTo" = @(
      "HTTP/web2.test.com"
    )
  }
}

Set-ADServiceAccount @web1gmsaSplat
</code></pre>

<h4 id="trusted_to_auth_for_delegation">TRUSTED_TO_AUTH_FOR_DELEGATION</h4>

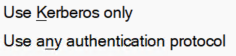
<p>You will see recommendations for <code>Set-AdAccountControl -TrustedToAuthForDelegation $true</code> or to set delegation to <em>Use any authentication protocol</em>. This is not necessary for Kerberos Constrained Delegation and is <strong>NOT</strong> recommended unless you are working with services that cannot support Kerberos and you are performing a protocol transition to Kerberos (i.e. S4U2self). You will see when you should consider using this in a following section.</p>

<p><img src="https://raw.githubusercontent.com/soulemike/soulemike.github.io/refs/heads/main/assets/kerberos-deep-dive/protocols.png" alt="Delegation Properties Protocol Selection" /></p>

<h3 id="iis-server-1">IIS Server</h3>

<p>Next our IIS server configuration, on our web1 server, needs to allow the AppPool, as our AppPool identity web1gmsa, to work with Local Security Authority (LSA) rather than the local machine. This is done by setting the IIS configuration flag <code>useAppPoolCredentials</code> to True.</p>

<p><img src="https://raw.githubusercontent.com/soulemike/soulemike.github.io/refs/heads/main/assets/kerberos-deep-dive/useAppPoolCreds.png" alt="IIS useAppPoolCredentials" /></p>

<h3 id="testing-1">Testing</h3>

<p>Now we can validate that we can authenticate to web2 as the user:</p>

<p><img src="https://raw.githubusercontent.com/soulemike/soulemike.github.io/refs/heads/main/assets/kerberos-deep-dive/success-2.png" alt="Success" /></p>

<p>This works even though our impersonation level is impersonation:</p>

<p><img src="https://raw.githubusercontent.com/soulemike/soulemike.github.io/refs/heads/main/assets/kerberos-deep-dive/impersonation.png" alt="Impersonation Only" /></p>

<p>On the client system we can also run <code>klist</code> to validate the Kerberos ticket works even though it does not have the <code>ok_as_delegate</code> flag:</p>

<p><img src="https://raw.githubusercontent.com/soulemike/soulemike.github.io/refs/heads/main/assets/kerberos-deep-dive/klist-2.png" alt="Kerberos Ticket" /></p>

<h2 id="resource-based-constrained-delegation">Resource-based Constrained Delegation</h2>

<blockquote>
  <p>AKA: S4U2proxy</p>
</blockquote>

<h3 id="summary-2">Summary</h3>

<p>In simple terms: “Allow <strong>this account</strong> to <strong>ACCEPT</strong> tickets from <strong>these principals</strong>.”</p>

<blockquote>
  <p>Don’t forget to reset everything</p>
</blockquote>

<p>These steps are necessary:</p>
<ul>
  <li>On the Domain Objects:
    <ul>
      <li>Allow delegation for the account that the backend AppPool is running under, web2, for the frontend SPN, web1.</li>
      <li>Add an SPN to the account, web1gmsa, for the service, web1.</li>
    </ul>
  </li>
  <li>On Web1:
    <ul>
      <li>Configure IIS to use the app pool credentials to work with the Kerberos tickets in kernel-mode rather than the machine account.</li>
    </ul>
  </li>
</ul>

<h3 id="ad-objects-3">AD Objects</h3>

<p>The account that the service, in our case the IIS AppPool, is running as, for us this is using the web1gmsa$ gMSA account. This could also be the computer account or a normal user account depending on the IIS AppPool configuration. Configure the service account domain object:</p>

<pre><code class="language-powershell">$web1gmsaSplat = @{
  Identity = "web1gmsa$"
  ServicePrincipalNames = @{
    Add = "HTTP/web1.test.com"
  }
}

$web2Splat = @{
  Identity = "web2"
  PrincipalsAllowedToDelegateToAccount = Get-ADServiceAccount -Identity "web1gmsa$"
}

Set-ADServiceAccount @web1gmsaSplat
Set-ADComputer @web2Splat
</code></pre>

<h3 id="iis-server-2">IIS Server</h3>

<p>Next our IIS server configuration, on our web1 server, needs to allow the AppPool, as our AppPool identity web1gmsa, to work with Local Security Authority (LSA) rather than the local machine. This is done by setting the IIS configuration flag <code>useAppPoolCredentials</code> to True.</p>

<p><img src="https://raw.githubusercontent.com/soulemike/soulemike.github.io/refs/heads/main/assets/kerberos-deep-dive/useAppPoolCreds.png" alt="IIS useAppPoolCredentials" /></p>

<h3 id="testing-2">Testing</h3>

<p>Now we can validate that we can authenticate to web2 as the user:</p>

<p><img src="https://raw.githubusercontent.com/soulemike/soulemike.github.io/refs/heads/main/assets/kerberos-deep-dive/success-2.png" alt="Success" /></p>

<p>This works even though our impersonation level is impersonation:</p>

<p><img src="https://raw.githubusercontent.com/soulemike/soulemike.github.io/refs/heads/main/assets/kerberos-deep-dive/impersonation.png" alt="Impersonation Only" /></p>

<p>On the client system we can also run <code>klist</code> to validate the Kerberos ticket works even though it does not have the <code>ok_as_delegate</code> flag:</p>

<p><img src="https://raw.githubusercontent.com/soulemike/soulemike.github.io/refs/heads/main/assets/kerberos-deep-dive/klist-2.png" alt="Kerberos Ticket" /></p>

<h2 id="when-to-use-trusted_to_auth_for_delegation">When to Use TRUSTED_TO_AUTH_FOR_DELEGATION</h2>

<h3 id="for-kerberos-constrained-delegation">For Kerberos Constrained Delegation</h3>

<blockquote>
  <p>AKA: S4U2self</p>
</blockquote>

<h4 id="summary-3">Summary</h4>

<p>In simple terms: “Allow <strong>this account</strong> to request tickets for <strong>these services</strong> on behalf of a user, even if that user didn’t originate the Kerberos ticket.”</p>

<blockquote>
  <p>Don’t forget to reset everything</p>
</blockquote>

<p>These steps are necessary:</p>
<ul>
  <li>On the Domain Objects:
    <ul>
      <li>Allow delegation for the account that the app is running under, web1gmsa, to the backend SPN, web2.</li>
      <li>Allow the account that the app is running under, web1gmsa, to perform S4U2self.</li>
      <li>Add an SPN to the account, web1gmsa, for the service, web1</li>
    </ul>
  </li>
  <li>On Web1:
    <ul>
      <li>Configure IIS to use the app pool credentials to work with the Kerberos tickets in kernel-mode rather than the machine account.</li>
      <li>Remove Negotiate from the Windows Authentication Providers to force NTLM.</li>
    </ul>
  </li>
</ul>

<h4 id="ad-objects-4">AD Objects</h4>

<p>The account that the service, in our case the IIS AppPool, is running as, for us this is using the web1gmsa$ gMSA account. This could also be the computer account or a normal user account depending on the IIS AppPool configuration. Configure the service account domain object:</p>

<pre><code class="language-powershell">$serviceAccountSplat = @{
  Identity = "web1gmsa$"
  ServicePrincipalNames = @{
    Add = "HTTP/web1.test.com"
  }
  Add = @{
    "msDs-AllowedToDelegateTo" = @(
      "HTTP/web2.test.com"
    )
  }
}
$accountControlSplat = @{
  Identity = "web1gmsa$"
  TrustedToAuthForDelegation = $true
}

Set-ADServiceAccount @serviceAccountSplat
Set-ADAccountControl @accountControlSplat
</code></pre>

<h4 id="iis-server-3">IIS Server</h4>

<p>Next our IIS server configuration, on our web1 server, needs to allow the AppPool, as our AppPool identity web1gmsa, to work with Local Security Authority (LSA) rather than the local machine. This is done by setting the IIS configuration flag <code>useAppPoolCredentials</code> to True.</p>

<p><img src="https://raw.githubusercontent.com/soulemike/soulemike.github.io/refs/heads/main/assets/kerberos-deep-dive/useAppPoolCreds.png" alt="IIS useAppPoolCredentials" /></p>

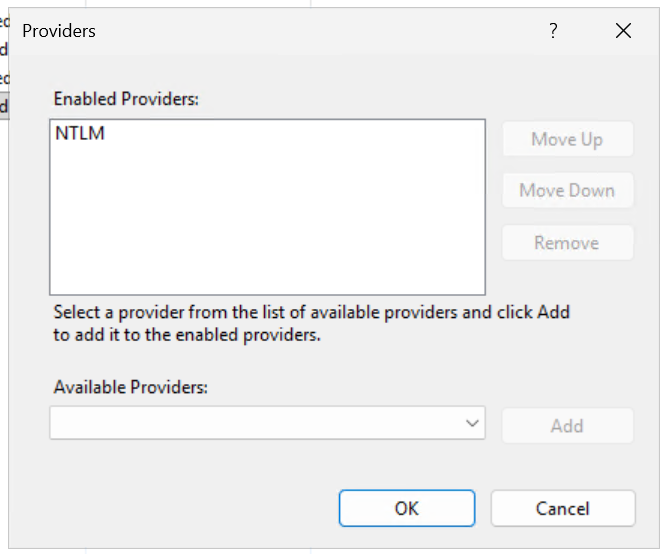
<p>We also need to remove the Negotiate Provider to ensure we are forcing NTLM authentication to web1.</p>

<p><img src="https://raw.githubusercontent.com/soulemike/soulemike.github.io/refs/heads/main/assets/kerberos-deep-dive/ntlmProvider.png" alt="NTLM Only" /></p>

<h4 id="testing-3">Testing</h4>

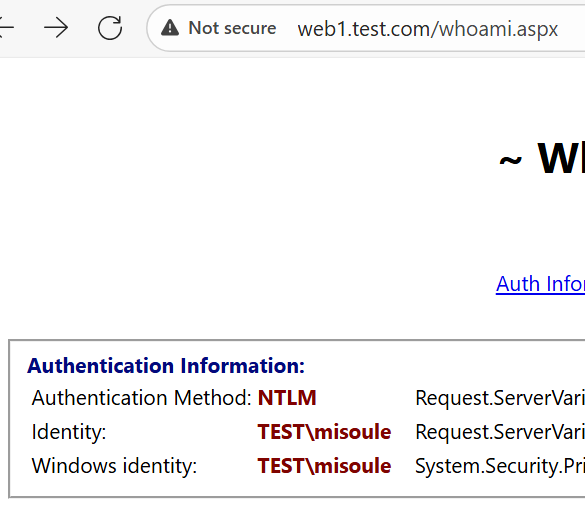
<p>Now when we log in to Web1 we can observer that we are authenticating using NTLM.</p>

<p><img src="https://raw.githubusercontent.com/soulemike/soulemike.github.io/refs/heads/main/assets/kerberos-deep-dive/ntlmAuth.png" alt="NTLM Authentication" /></p>

<p>But when we then access web2 from web1, we can see that we authenticate to web2 using Kerberos.</p>

<p><img src="https://raw.githubusercontent.com/soulemike/soulemike.github.io/refs/heads/main/assets/kerberos-deep-dive/success-3.png" alt="S4U2Self Success" /></p>

<h3 id="for-resource-based-constrained-delegation">For Resource-based Constrained Delegation</h3>

<p>With Resource-based Constrained Delegation any principal that is trusted for delegation can perform protocol transition by default. You can block that using the backend servers Local Security Policy.</p>

<p>Follow the same steps as in <a href="#Resource-based-Constrained-Delegation">Resource-based Constrained Delegation</a>.</p>

<h4 id="blocking-rbcd-from-the-backend-object">Blocking RBCD from the Backend Object</h4>

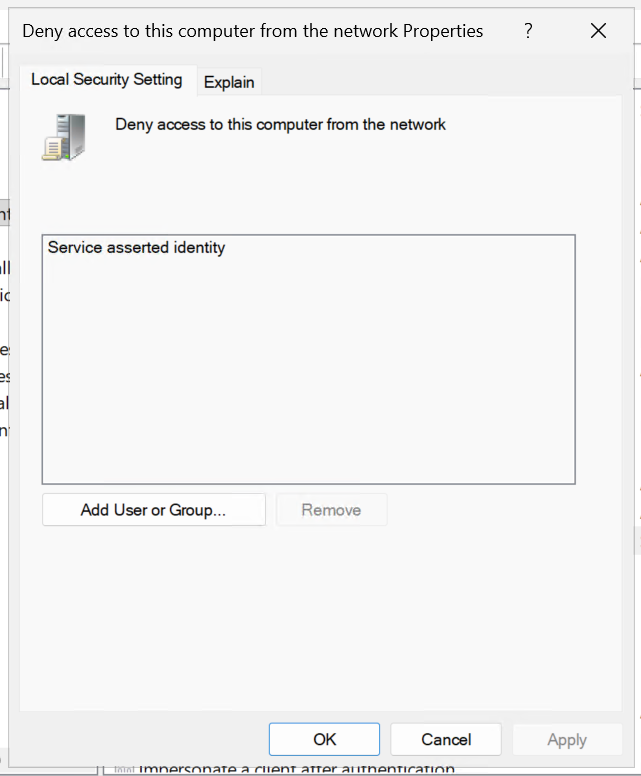
<p>Within the Windows Local Security Policy add the well-known object <em>Service asserted identity</em> to the <em>Deny access to this computer from the network</em> policy.</p>

<p><img src="https://raw.githubusercontent.com/soulemike/soulemike.github.io/refs/heads/main/assets/kerberos-deep-dive/denyAccess.png" alt="Deny S4U2Self logons" /></p>

<p>Now when you proceed to test with protocol transition from NTLM authentication to web1 using Kerberos to web2, web2 will block the authentication.</p>

<p><img src="https://raw.githubusercontent.com/soulemike/soulemike.github.io/refs/heads/main/assets/kerberos-deep-dive/fail.png" alt="fail" /></p>

<h2 id="references">References</h2>

<ul>
  <li>https://blog.joeware.net/2008/07/17/1407/</li>
  <li>https://github.com/SurajDixit/KerberosConfigMgrIIS/releases</li>
  <li>https://learn.microsoft.com/en-us/deployedge/microsoft-edge-browser-policies/authnegotiatedelegateallowlist</li>
  <li>https://learn.microsoft.com/en-us/entra/identity/app-proxy/application-proxy-back-end-kerberos-constrained-delegation-how-to</li>
  <li>https://learn.microsoft.com/en-us/iis/configuration/system.webserver/security/authentication/windowsauthentication/</li>
  <li>https://learn.microsoft.com/en-us/openspecs/windows_protocols/ms-sfu/1fb9caca-449f-4183-8f7a-1a5fc7e7290a</li>
  <li>https://learn.microsoft.com/en-us/powershell/module/activedirectory/set-adaccountcontrol?view=windowsserver2025-ps#-trustedtoauthfordelegation</li>
  <li>https://learn.microsoft.com/en-us/previous-versions/office/communications-server/dd573004(v=office.13)?redirectedfrom=MSDN</li>
  <li>https://learn.microsoft.com/en-us/previous-versions/windows/it-pro/windows-10/security/threat-protection/auditing/event-4769</li>
  <li>https://learn.microsoft.com/en-us/troubleshoot/developer/webapps/aspnet/development/implement-impersonation</li>
  <li>https://learn.microsoft.com/en-us/troubleshoot/developer/webapps/iis/www-authentication-authorization/diagnostics-pages-windows-integrated-authentication</li>
  <li>https://learn.microsoft.com/en-us/troubleshoot/developer/webapps/iis/www-authentication-authorization/kerberos-double-hop-authentication-edge-chromium#how-to-know-whether-the-kerberos-ticket-obtained-on-the-client-to-send-to-the-web-server-uses-constrained-or-unconstrained-delegation</li>
  <li>https://learn.microsoft.com/en-us/troubleshoot/developer/webapps/iis/www-authentication-authorization/troubleshoot-kerberos-failures-ie#does-kerberos-authentication-fail-in-iis-7-and-later-versions-even-though-it-works-in-iis-6</li>
  <li>https://learn.microsoft.com/en-us/troubleshoot/sql/database-engine/connect/windows-prevents-unconstrained-delegation</li>
  <li>https://learn.microsoft.com/en-us/troubleshoot/windows-server/active-directory/useraccountcontrol-manipulate-account-properties</li>
  <li>https://learn.microsoft.com/en-us/windows-server/identity/ad-ds/manage/group-managed-service-accounts/group-managed-service-accounts/configure-kerberos-delegation-group-managed-service-accounts</li>
  <li>https://learn.microsoft.com/en-us/windows-server/security/kerberos/kerberos-constrained-delegation-overview#security-implications-of-resource-based-constrained-delegation</li>
  <li>https://learn.microsoft.com/en-us/windows-server/security/kerberos/kerberos-constrained-delegation-overview#what-works-differently</li>
  <li>https://learn.microsoft.com/en-us/windows/security/identity-protection/credential-guard/configure?tabs=reg</li>
  <li>https://learn.microsoft.com/en-us/windows/win32/adschema/a-spnmappings</li>
  <li>https://learn.microsoft.com/en-us/windows/win32/secauthn/lsa-authentication</li>
  <li>https://techcommunity.microsoft.com/blog/askds/kerberos-and-load-balancing/399539</li>
  <li>https://techcommunity.microsoft.com/blog/iis-support-blog/all-about-kerberos-%e2%80%9cthe-three-headed-dog%e2%80%9d-with-respect-to-iis-and-sql/347839</li>
  <li>https://techcommunity.microsoft.com/blog/iis-support-blog/service-principal-name-spn-checklist-for-kerberos-authentication-with-iis-7-07-5/347639</li>
  <li>https://techcommunity.microsoft.com/blog/iis-support-blog/setting-up-kerberos-authentication-for-a-website-in-iis/347882</li>
</ul>]]></content><author><name>Mike Soule</name></author><category term="Other" /><summary type="html"><![CDATA[Overview]]></summary></entry><entry><title type="html">Using AI to collect, summarize, and manage social activities</title><link href="http://log.noworseoff.com/2025/10/15/LinkedIn-and-Ai.html" rel="alternate" type="text/html" title="Using AI to collect, summarize, and manage social activities" /><published>2025-10-15T00:00:00+00:00</published><updated>2025-10-15T00:00:00+00:00</updated><id>http://log.noworseoff.com/2025/10/15/LinkedIn-and-Ai</id><content type="html" xml:base="http://log.noworseoff.com/2025/10/15/LinkedIn-and-Ai.html"><![CDATA[<p>Was doing some reporting and needed to pull down a bunch of LinkedIn post activity and get it summarized.</p>

<p>🤖 Well GPTs are a thing now, and this takes minutes instead of hours.</p>

<p>Using Doug Finke’s PSAI module and Przemyslaw Klys PSParseHTML module, this was short work.</p>

<p>💭 Gist link to follow in the comments shortly.</p>

<ol>
  <li>Go to https://www.linkedin.com/in/<username>/recent-activity/all/</username></li>
  <li>Scroll as far back as you desire</li>
  <li>Run this in console, copy object, and clean up to URL format</li>
</ol>

<pre><code class="language-javascript">// Select the parent UL element
const container = document.querySelector('#profile-content &gt; div &gt; div.scaffold-layout.scaffold-layout--breakpoint-xl.scaffold-layout--sidebar-main-aside.scaffold-layout--reflow &gt; div &gt; div &gt; main &gt; div &gt; section &gt; div.pv0.ph5 &gt; div &gt; div &gt; div.scaffold-finite-scroll__content &gt; ul');

if (container) {
  // Select all elements within that UL that have data-urn containing "urn:li:activity:"
  const elements = container.querySelectorAll('[data-urn*="urn:li:activity:"]');

  // Filter out any elements that *have a child* with the class update-components-header__text-view
  const filtered = Array.from(elements).filter(el =&gt; 
    !el.querySelector('.update-components-header__text-view')
  );

  // Extract data-urn values
  const urns = filtered.map(el =&gt; el.getAttribute('data-urn'));

  console.log(urns);
} else {
  console.warn('Container not found.');
}
</code></pre>

<ol>
  <li>Copy that object out and clean it up as an array</li>
</ol>

<pre><code class="language-powershell">$activities = @"
    https://www.linkedin.com/feed/update/urn:li:activity:000000000000000000000
"@
</code></pre>

<ol>
  <li>Make sure you have PSAI and PSParseHtml installed, and you have a local vault secret for your Azure OpenAI instance then run the below</li>
</ol>

<pre><code class="language-powershell">$activities = $activities.Split("`n")

$posts = @()
$regex = "[-:](?'id'[0-9]{19})(?:[-\/?\s]|$)"

#Install-Module psparsehtml, psai
Invoke-Expression $(Get-Secret -Name PSAI -AsPlainText)
Set-OAIProvider -Provider AzureOpenAI
Set-AzOAISecrets @secret

$prompt = "Provide a summary of no more than 10 words for the followng:"

foreach($activity in $activities){
    $post = @{
        activity     = $activity
        activityId   = @{}
        htmlDoc      = Invoke-RestMethod $activity
        postContent  = ""
        shortContent = ""
        summary      = ""
    }

    $postContentObject = ConvertFrom-Html -Content $post.htmlDoc
    $post.postContent = $postContentObject.selectNodes('//article').selectNodes('//p')|Where-Object{
        $_.Attributes.Name -eq "class" -and `
        $_.Attributes.Value -like "*attributed-text-segment-list__content*"}
    |Select-Object -First 1 -ExpandProperty InnerText
    $activity
    $post.shortContent = $post.postContent.Substring(0,[Math]::Min(200,$post.postContent.Length)-1)

    if($post.shortContent -ne ""){
      $post.summary = Invoke-OAIChat "$prompt $($post.shortContent)"
    }

    $match = [Regex]::Match($activity,$regex)
    $id = @{
        decimal         = ($match.Groups["id"]).Value
        binary          = ""
        timestampBinary = ""
        timestamp       = ""
    }
    $id.binary = [Convert]::ToString($id.decimal,2)
    $id.timestampBinary = $id.binary.Substring(0,41)
    $id.timestamp = [DateTimeOffset]::FromUnixTimeMilliseconds([Convert]::ToInt64($id.timestampBinary,2)).DateTime

    $post.activityId = $id
    $posts += $post
}
</code></pre>

<ol>
  <li>Now I keep all this activity in a SharePoint Online List for easy integration and analysis later, be sure to update the SPO Instance URL, Site Name, and List GUID below</li>
</ol>

<pre><code class="language-powershell">$site = Invoke-MgGraphRequest -Uri "v1.0/sites/&lt;SpoInstanceUrl&gt;:/sites/&lt;SiteName&gt;"
$list = Invoke-MgGraphRequest -Uri "v1.0/sites/$($site.id)/lists/&lt;ListGuid&gt;"

foreach($post in $posts|?{$_.Summary -ne ""}){
    $check = Invoke-MgGraphRequest -Uri "v1.0/sites/$($site.id)/lists/$($list.id)/items?`$expand=fields&amp;`$filter=fields/LinkedInActivity eq '$($post.activityId.decimal)'"
    if(($check.Value|Measure-Object).Count -gt 0){
        Write-Warning "$($post.activityId.decimal) found in list, skipping"
        continue
    }
    $item = @{
        fields = @{
            Title = $post.summary
            ActivityType = "Social Post (LinkedIn/YouTube, etc...)"
            Partner = "To Do"
            BulkReference = $post.activity
            Relevant_x0020_When = $post.activityId.timestamp.ToString("yyyy-MM-ddTHH:mm:ssZ")
            LinkedInActivity = $post.activityId.decimal
        }
    }
    Invoke-MgGraphRequest -Uri "v1.0/sites/$($site.id)/lists/$($list.id)/items" -Method POST -Body $item|ConvertTo-Json
}
</code></pre>

<ol>
  <li>Filter your list using the To Do Partner value or alternate columns and update as necessary</li>
</ol>

<p>Example of the results:</p>

<p><img width="528" height="651" alt="image" src="https://github.com/user-attachments/assets/f3133333-4952-4f1d-b0ca-445efd61bd87" /></p>

<h2 id="bonus">Bonus</h2>

<p>Doug, the author of PSAI, shared an awesome example with me of how using AI lets you reconsider how you approach work. This is a fairly deterministic and planned approach with rigid structure.</p>

<p>Alternatively you can just let AI figure it out:</p>

<pre><code class="language-powershell">New-Agent -Tools Invoke-RestMethod | Get-AgentResponse '

provide a summary of the following LinkedIn activities, you can browse to these links using your tools:
https://www.linkedin.com/feed/update/urn:li:activity:7383533745330618368
https://www.linkedin.com/feed/update/urn:li:activity:7383532739548979200
https://www.linkedin.com/posts/douglasfinke_ai-that-works-the-sf-unconference-is-under-activity-7383507297903206400-zvu0
## Expected output
$post = @{
    activity    
    activityId  
    htmlDoc     
    postContent 
    shortContent
    summary     
}
'
</code></pre>]]></content><author><name>Mike Soule</name></author><category term="Other" /><summary type="html"><![CDATA[Was doing some reporting and needed to pull down a bunch of LinkedIn post activity and get it summarized.]]></summary></entry><entry><title type="html">Overview of Defender for Servers Capabilities</title><link href="http://log.noworseoff.com/2025/08/28/Defender-for-servers-overview.html" rel="alternate" type="text/html" title="Overview of Defender for Servers Capabilities" /><published>2025-08-28T00:00:00+00:00</published><updated>2025-08-28T00:00:00+00:00</updated><id>http://log.noworseoff.com/2025/08/28/Defender-for-servers-overview</id><content type="html" xml:base="http://log.noworseoff.com/2025/08/28/Defender-for-servers-overview.html"><![CDATA[<p>I have been working on some content for a new presentation that is coming up. One of the components is around Defender for Servers, which is a fairly nuanced topic and gets confusing, especially when clients are looking to fully embrace Microsoft’s threat protection model.</p>

<p>If you have ever seen Aaron Dinnage’s M365 Maps, then you will immediately see they inspired this concept.</p>

<p>There are lots of goodies packed into these bundles and worth understanding beyond just gaining the EDR capabilities. I will link to the GitHub Gist in the comments where you can view the diagram and where each box has a click through link to the Microsoft documentation.</p>

<p>https://gist.github.com/soulemike/29eb73e47d849b1fc647cf3c5a7440d4</p>

<pre><code class="language-mermaid">flowchart LR
    subgraph mdsp2 [Defender for Servers Plan 2]
        subgraph mdsp1 [Defender for Servers Plan 1]
            mcahs(Multicloud and hybrid support)
            dfeao(Defender for Endpoint automatic onboarding)
            mdeedr(Defender for Endpoint EDR)
            iaai(Integrated alerts and incidents)
            sid(Software inventory discovery via Defender Vulnerability Management)
            rca(Regulatory compliance assessment)
            vsab(Vulnerability scanning #40;agent-based#41;)

            mcahs ~~~ dfeao ~~~ mdeedr
            iaai ~~~ sid ~~~ rca
        end
        vsa(Vulnerability scanning #40;agentless#41;)
        mdda(Defender for DNS alerts)
        tdanl(Threat detection #40;Azure network layer#41;)
        osu(OS system updates)
        mdevm(Defender for Vulnerability Management premium features)
        msa(Malware scanning #40;agentless#41;)
        mssa(Machine secrets scanning #40;agentless#41;)
        fim(File integrity monitoring)
        jitvma(Just-in-time virtual machine access)
        nm(Network map)
        fdi(Free data ingestion #40;500 MB#41;)
        subgraph arc [Azure Arc-enabled servers]
            aum(Azure Update Manager)
            ap(Azure Policy Guest Configuration)

            aum ~~~ ap
        end

        mdsp1 ~~~ arc ~~~ osu
        vsa ~~~ mdda ~~~ tdanl ~~~ nm
        osu ~~~ mdevm ~~~ msa ~~~ fdi
        mssa ~~~ fim ~~~ jitvma
    end


    click mdsp1,mdsp2 "https://learn.microsoft.com/en-us/azure/defender-for-cloud/defender-for-servers-overview"
    click mcahs "https://learn.microsoft.com/en-us/azure/defender-for-cloud/support-matrix-defender-for-servers"
    click dfeao,mdeedr "https://learn.microsoft.com/en-us/azure/defender-for-cloud/integration-defender-for-endpoint"
    click iaai "https://learn.microsoft.com/en-us/azure/defender-for-cloud/concept-integration-365"
    click sid "https://learn.microsoft.com/en-us/azure/defender-for-cloud/asset-inventory"
    click rca "https://learn.microsoft.com/en-us/azure/defender-for-cloud/concept-regulatory-compliance-standards"
    click vsab "https://learn.microsoft.com/en-us/azure/defender-for-cloud/auto-deploy-vulnerability-assessment"
    click vsa "https://learn.microsoft.com/en-us/azure/defender-for-cloud/concept-agentless-data-collection"
    click mdda "https://learn.microsoft.com/en-us/azure/defender-for-cloud/defender-for-dns-introduction"
    click tdanl "https://learn.microsoft.com/en-us/azure/defender-for-cloud/alerts-azure-network-layer"
    click osu "https://learn.microsoft.com/en-us/azure/defender-for-cloud/enable-periodic-system-updates"
    click mdevm "https://learn.microsoft.com/en-us/defender-vulnerability-management/defender-vulnerability-management-capabilities"
    click msa "https://learn.microsoft.com/en-us/azure/defender-for-cloud/agentless-malware-scanning"
    click mssa "https://learn.microsoft.com/en-us/azure/defender-for-cloud/concept-agentless-data-collection"
    click fim "https://learn.microsoft.com/en-us/azure/defender-for-cloud/file-integrity-monitoring-overview"
    click jitvma "https://learn.microsoft.com/en-us/azure/defender-for-cloud/just-in-time-access-overview"
    click nm "https://learn.microsoft.com/en-us/azure/defender-for-cloud/protect-network-resources"
    click fdi "https://learn.microsoft.com/en-us/azure/defender-for-cloud/data-ingestion-benefit"
    click aum "https://learn.microsoft.com/en-us/azure/update-manager/update-manager-faq#are-there-scenarios-in-which-arc-enabled-server-isnt-charged-for-azure-update-manager"
    click ap "https://learn.microsoft.com/en-us/azure/defender-for-cloud/operating-system-misconfiguration"
</code></pre>

<p>Building on this post from yesterday. I also put together a visual representing the many hot topics associated with Microsoft Azure Arc.</p>

<p>There is so much value in these tools, and if you work in infrastructure and operations these are the tools you need to be comfortable with in any cloud or hybrid environment.</p>

<p>https://gist.github.com/soulemike/56bd92a0265c28081973363676d95f92</p>

<pre><code class="language-mermaid">flowchart LR
    subgraph arc [Azure Arc #40;$ Additional Costs#41;]
        direction LR
        subgraph mdsp2 [Defender for Servers Plan 2 Entitlements $]
            direction LR
            mdsp1(Defender for Servers Plan 1 $)
            aum1(Azure Update Manager)
            ap(Azure Policy Guest Configuration $)
            ap ~~~ aum1 &amp; mdsp1
        end
        subgraph sa [Software Assurance Entitlements #40;* Exclusive Software Assurance Benefit#41;]
            aum2(Azure Update Manager)
            acti(Azure Change Tracking and Inventory $)
            amc(Azure Machine Configuration $)
            wac(Windows Admin Center in Azure for Arc *)
            rs(Remote Support $*)
            nh(Network HUD *)
            bpa(Best Practices Assessment $*)
            asrc(Azure Site Recovery Configuration $*)
        end
        amal(Azure Monitor $)
        amscom(Azure Monitor SCOM Managed Instance $)
        ms(Microsoft Sentinel $)
        aum4(Azure Update Manager)
        auto(Azure Automation $)
        amc3(Azure Policy Guest Configuration and Change Tracking &amp; Inventory $)
        migrate(Azure Migrate $)
        run(Azure Run Command)
        k8s(Azure Arc-enabled Kubernetes)
        jump(Azure Arc Jumpstart $)
        plink(Azure Private Link $)
        kv(Azure Key Vault $)
        
        subgraph lic [Windows &amp; SQL Server Licensing]
            subgraph esu [Extended Security Updates enabled by Azure Arc]
                wsesu(For Windows Server 2012/R2 $)
                ss12esu(For SQL Server 2012 $)
                ss14esu(For SQL Server 2014 $)
            end
            ss(SQL Server pay-as-you-go enabled by Azure Arc $)
            subgraph ws [Windows Server Pay-as-you-go enabled by Azure Arc $]
                amu3(Azure Update Manager)
                acti2(Azure Change Tracking and Inventory $)
                amc2(Azure Machine Configuration $)
            end
        end

        subgraph core [Core control plane]
            direction LR
            inv(Inventory)
            manage(Manage)
            vm(VM Self-service)
            mi(Managed Identities)
            ext(VM Extensions)
        end

        core ~~~ plink &amp; kv &amp; k8s &amp; amal &amp; amscom &amp; ms
        ms ~~~ jump
        plink ~~~ aum4
        kv ~~~ auto
        amscom ~~~ run
        amal ~~~ migrate
        k8s ~~~ amc3
                
        amc3 &lt;--&gt; amc2 &lt;--&gt; amc &lt;--&gt; ap
        amc3 &lt;--&gt; acti2 &lt;--&gt; acti
        aum4 &lt;--&gt; amu3 &lt;--&gt; aum2 &lt;--&gt; aum1
    end

    classDef blank fill:none,stroke-width:0px;

    click mdsp1 "https://learn.microsoft.com/en-us/azure/defender-for-cloud/defender-for-servers-overview"
    click inv "https://learn.microsoft.com/en-us/azure/azure-arc/servers/organize-inventory-servers"
    click manage "https://learn.microsoft.com/en-us/azure/azure-arc/servers/ssh-arc-overview"
    click vm "https://learn.microsoft.com/en-us/azure/azure-arc/vmware-vsphere/overview"
    click ap,amc,amc2,amc3 "https://docs.azure.cn/en-us/governance/policy/concepts/guest-configuration"
    click acti,acti2 "https://learn.microsoft.com/en-us/azure/automation/change-tracking/overview-monitoring-agent"
    click aum1,aum2,amu3,aum4 "https://learn.microsoft.com/en-us/azure/update-manager/overview"
    click wac "https://learn.microsoft.com/en-us/windows-server/manage/windows-admin-center/azure/manage-arc-hybrid-machines"
    click rs "https://learn.microsoft.com/en-us/windows-server/manage/azure-arc/remote-support-for-windows-server"
    click nh "https://docs.azure.cn/en-us/azure-local/concepts/network-hud-overview"
    click bpa "https://learn.microsoft.com/en-us/windows-server/manage/azure-arc/best-practices-assessment-for-windows-server"
    click asrc "https://learn.microsoft.com/en-us/windows-server/manage/azure-arc/azure-site-recovery-for-windows-server"
    click wsesu "https://learn.microsoft.com/en-us/azure/azure-arc/servers/prepare-extended-security-updates"
    click ss "https://learn.microsoft.com/en-us/sql/sql-server/azure-arc/manage-license-billing"
    click ss12esu,ss14esu "https://learn.microsoft.com/en-us/sql/sql-server/azure-arc/extended-security-updates"
    click amal "https://learn.microsoft.com/en-us/azure/cloud-adoption-framework/scenarios/hybrid/arc-enabled-servers/eslz-management-and-monitoring-arc-server"
    click amscom "https://learn.microsoft.com/en-us/azure/azure-monitor/scom-manage-instance/overview"
    click ms "https://learn.microsoft.com/en-us/azure/azure-arc/servers/scenario-onboard-azure-sentinel"
    click mi "https://learn.microsoft.com/en-us/azure/azure-arc/servers/cloud-native/identity-access"
    click ext "https://learn.microsoft.com/en-us/azure/azure-arc/servers/manage-vm-extensions"
    click auto "https://learn.microsoft.com/en-us/azure/automation/extension-based-hybrid-runbook-worker-install"
    click migrate "https://learn.microsoft.com/en-us/azure/azure-arc/servers/scenario-migrate-to-azure"
    click run "https://learn.microsoft.com/en-us/azure/azure-arc/servers/run-command"
    click jump "https://jumpstart.azure.com/"
    click plink "https://learn.microsoft.com/en-us/azure/cloud-adoption-framework/scenarios/hybrid/arc-enabled-servers/eslz-arc-servers-connectivity#private-link"
    click kv "https://learn.microsoft.com/en-us/azure/cloud-adoption-framework/scenarios/hybrid/arc-enabled-servers/eslz-security-governance-and-compliance#secret-and-certificate-management"
    click k8s "https://learn.microsoft.com/en-us/azure/azure-arc/kubernetes/overview"
</code></pre>]]></content><author><name>Mike Soule</name></author><category term="Other" /><summary type="html"><![CDATA[I have been working on some content for a new presentation that is coming up. One of the components is around Defender for Servers, which is a fairly nuanced topic and gets confusing, especially when clients are looking to fully embrace Microsoft’s threat protection model.]]></summary></entry><entry><title type="html">PowerShell Remoting over SSH</title><link href="http://log.noworseoff.com/2023/08/29/powershell-ssh.html" rel="alternate" type="text/html" title="PowerShell Remoting over SSH" /><published>2023-08-29T00:00:00+00:00</published><updated>2023-08-29T00:00:00+00:00</updated><id>http://log.noworseoff.com/2023/08/29/powershell-ssh</id><content type="html" xml:base="http://log.noworseoff.com/2023/08/29/powershell-ssh.html"><![CDATA[<p>When working in public cloud environments like AWS or Azure, frequently you will need to create a lot of new Windows Server instances that are short lived. Often using RDP to access these is cumbersome. You may find yourself having similar needs or may just be looking for a shell-first administration experience.</p>

<p><a href="https://learn.microsoft.com/en-us/powershell/scripting/learn/remoting/running-remote-commands">PowerShell Remoting</a> offers a great answer. You can simply run <code>Enter-PSSession</code> and be on your way.</p>

<p>The only downside is the default configuration isn’t the most accommodating. The default configuration relies on WinRM, Microsoft’s WS-Management protocol implementation, which provides many excellent features but requires more dependencies. You’d want to be domain joined and have proper certificates configured to really use it smoothly. More on that to come later.</p>

<p>You want to have a shell-first experience, but you want to use a transport protocol you can set up quickly and without many dependencies.</p>

<p><strong>Enter PowerShell Remoting over SSH!</strong></p>

<p>You will want to keep reading to see a quick way to get started!</p>

<h2 id="prerequisites">Prerequisites</h2>

<p>You need to tackle a couple of prerequisites:</p>

<ul>
  <li>Windows Server 2019 or newer</li>
  <li>PowerShell 7 or newer</li>
  <li>Local Admin Account</li>
</ul>

<h2 id="installing-openssh-server">Installing OpenSSH Server</h2>

<p>You will use the below combo to get the latest version of OpenSSH Server and add the Windows Capability Package to your instance.</p>

<p>The <code>Get-WindowsCapability -Online</code> command provides you with all the capability packages available to you.</p>

<p>You pass all those packages through the pipeline to <code>|?{$_.Name -like "OpenSSH.Server*"}</code>. Using the <code>?{}</code> alias for <code>Where-Object</code> and you target the <code>Name</code> property of your capability packages that begins with “OpenSSH.Server”.</p>

<p>Finally, you pass the capability packages that match your property criteria through the pipeline to <code>|Add-WindowsCapability -Online</code>. This will acquire and install the capability package on your instance.</p>

<pre><code class="language-powershell">Get-WindowsCapability -Online|?{$_.Name -like "OpenSSH.Server*"}|Add-WindowsCapability -Online
</code></pre>

<h2 id="testing-openssh-server">Testing OpenSSH Server</h2>

<p>Now that you installed the OpenSSH Server. You will want to start it and make sure it is able to run.</p>

<p>Use <code>Start-Service sshd</code> to turn on the server and then <code>Test-NetConnection localhost -Port 22</code> to see if the server is listening on the default SSH port.</p>

<pre><code class="language-powershell">Start-Service sshd
Test-NetConnection localhost -Port 22
</code></pre>

<blockquote>
  <p>If you run into challenges here. You could have other processes bound to port 22 already, you may have older versions of OpenSSH Server installed, or a number of other issues. The Windows Event Log would hopefully provide a good starting point for what may be an issue.</p>
</blockquote>

<h2 id="configure-password-authentication">Configure Password Authentication</h2>

<p>Since you want a simple path forward, you will just enable password authentication.</p>

<p>With the commands below you use the <code>cp</code> alias to copy the current OpenSSH Server config and append <code>.old</code> to the filename. Then you use the <code>gc</code> alias to get the contents of the config file with <code>-repace</code> to uncomment the specific config line. You finish by passing the content with the change through the pipeline to the <code>sc</code> alias to set the content for the config file. Finally, you can restart the service to have the new config file take effect.</p>

<pre><code class="language-powershell">cp "$env:ProgramData\ssh\sshd_config" "$env:ProgramData\ssh\sshd_config.old"
(gc "$env:ProgramData\ssh\sshd_config") -replace "#PasswordAuthentication yes", "PasswordAuthentication yes" | sc $env:ProgramData\ssh\sshd_config
Restart-Service sshd
</code></pre>
<h3 id="configure-kerberos-single-sign-on-authentication">Configure Kerberos Single Sign-On Authentication</h3>

<p>Another awesome capability is support for the GSSAPI libraries for Kerberos Single Sign-On (SSO) authentication. This is an optional capability but can provide a much cleaner access experience.</p>

<blockquote>
  <p>Windows to Windows works smoothly, implementations with Linux SSH servers add more complexity but should still be viable.</p>
</blockquote>

<pre><code class="language-powershell">(gc "$env:ProgramData\ssh\sshd_config") -replace "#GSSAPIAuthentication no", "GSSAPIAuthentication yes" | sc $env:ProgramData\ssh\sshd_config
Restart-Service sshd
</code></pre>

<h2 id="connecting-to-your-server">Connecting to Your Server</h2>

<p>You can now use <a href="https://www.chiark.greenend.org.uk/~sgtatham/putty/latest.html#:~:text=putty.exe">Putty</a> or another SSH client. When you connect, your session prompt will default to Windows Command Prompt (i.e., <code>cmd.exe</code>).</p>

<blockquote>
  <p>You will not be able to use PowerShell Remoting with <code>Enter-PsSession</code> at this point.</p>
</blockquote>

<p>You will set the default prompt to PowerShell Core using the <code>New-ItemPropery</code> commandlet to set the <code>DefaultShell</code> value of the <code>OpenSSH</code> key within the <code>HKEY_LOCAL_MACHINE\SOFTWARE</code> hive registry path. The <code>data</code> within the key’s value is the path to the PowerShell Core executable using the short filename path (i.e., 8.3 filename). The value of <code>c:/progra~1/powershell/7/pwsh.exe</code> is the default location. Then you will need to restart the SSH service.</p>

<p>When you next connect you will see your PowerShell Core prompt.</p>

<pre><code class="language-powershell">New-ItemProperty -Path "HKLM:\SOFTWARE\OpenSSH" -Name DefaultShell -Value "c:/progra~1/powershell/7/pwsh.exe" -PropertyType String -Force
Restart-Service sshd
</code></pre>

<h3 id="openssh-subsystem">OpenSSH Subsystem</h3>

<p>To enable the PowerShell Remoting functionality (e.g., <code>Enter-PsSession</code>) you will need to configure an <a href="https://learn.microsoft.com/en-us/powershell/scripting/learn/remoting/ssh-remoting-in-powershell-core?view=powershell-7.3#overview">OpenSSH Subsystem</a>. This will allow OpenSSH to create a PowerShell process for the remoting session to connect with.</p>

<p>With the commands below you use the <code>gc</code> alias to get the contents of the config file with <code>-repace</code> to uncomment the specific config line. You finish by passing the content with the change through the pipeline to the <code>sc</code> alias to set the content for the config file. You can restart the service for the new config file take effect.</p>

<pre><code class="language-powershell">(gc "$env:ProgramData\ssh\sshd_config") -replace "# override default of no subsystems", "$&amp;`nSubsystem powershell c:/progra~1/powershell/7/pwsh.exe -sshs -nologo -noprofile" | sc $env:ProgramData\ssh\sshd_config
Restart-Service sshd
</code></pre>

<h3 id="using-enter-pssession">Using Enter-PSSession</h3>

<p>Once you configure your server for the subsystem and authentication methods you can begin using <code>Enter-PSSession</code>.</p>

<p>If you want to use the Kerberos SSO functionality with GSSAPI, then you need to specify the client options when connecting. A simple method to accomplish this is shown below.</p>

<pre><code class="language-powershell">$options = @{
  GSSAPIDelegateCredentials = "yes"
  GSSAPIAuthentication = "yes"
}
Enter-PSSession -HostName &lt;FQDN&gt; -Options $options
</code></pre>

<blockquote>
  <p><a href="https://gist.github.com/Snozzberries/74d24e9eb3d0dc9b9ecb56030275a871#kerberos-double-hop">Resource-Based Constrained Delegation</a> is also supported to utilize Kerberos S4U for the double hop scenario support.</p>
</blockquote>

<h2 id="putting-it-all-together">Putting It All Together</h2>

<p>Circling back on how to apply all of this. You can use the following as an AWS User Data script to:</p>

<ul>
  <li>Identify, download, and install the latest version of PowerShell Core.</li>
  <li>Acquire, install, and set the startup to automatic for OpenSSH Server service.</li>
  <li>Attempt to add a firewall rule allowing access to OpenSSH Server.</li>
  <li>Setting the default shell to PowerShell Core for OpenSSH Server interactive sessions.</li>
  <li>Create a backup copy of the default <code>sshd_config</code> file.</li>
  <li>Configure PowerShell Core as an OpenSSH Server Subsystem to allow for asynchronous commands.</li>
  <li>Configure OpenSSH Server to allow password authentication.</li>
  <li>Apply the configuration changes with a restart of the OpenSSH Server service.</li>
</ul>

<pre><code class="language-powershell">&lt;powershell&gt;
$r=[System.Net.WebRequest]::Create("https://github.com/PowerShell/PowerShell/releases/latest")
$r.AllowAutoRedirect=$false
$r.Method="Head"
$t=$r.GetResponse().Headers["Location"]
$v=$t.substring($t.indexOf("/tag/v")+6,$t.length-$t.indexOf("/tag/v")-6)
irm https://github.com/PowerShell/PowerShell/releases/download/v$v/PowerShell-$v-win-x64.msi -OutFile ".\Powershell-$v-win-x64.msi"
Start-Process msiexec.exe -Wait -ArgumentList "/I Powershell-$v-win-x64.msi /quiet /l*v .\Powershell-$v-win-x64.msi.log"
Get-WindowsCapability -Online|?{$_.Name -like "OpenSSH.Server*"}|Add-WindowsCapability -Online
Start-Service sshd
Set-Service -Name sshd -StartupType 'Automatic'
New-NetFirewallRule -Name 'OpenSSH-Server-In-TCP' -DisplayName 'OpenSSH Server (sshd)' -Enabled True -Direction Inbound -Protocol TCP -Action Allow -LocalPort 22
New-ItemProperty -Path "HKLM:\SOFTWARE\OpenSSH" -Name DefaultShell -Value "c:/progra~1/powershell/7/pwsh.exe" -PropertyType String -Force
cp "$env:ProgramData\ssh\sshd_config" "$env:ProgramData\ssh\sshd_config.old"
(gc "$env:ProgramData\ssh\sshd_config") -replace "# override default of no subsystems", "$&amp;`nSubsystem powershell c:/progra~1/powershell/7/pwsh.exe -sshs -nologo -noprofile" | sc $env:ProgramData\ssh\sshd_config
(gc "$env:ProgramData\ssh\sshd_config") -replace "#PasswordAuthentication yes", "PasswordAuthentication yes" | sc $env:ProgramData\ssh\sshd_config
(gc "$env:ProgramData\ssh\sshd_config") -replace "#GSSAPIAuthentication no", "GSSAPIAuthentication yes" | sc $env:ProgramData\ssh\sshd_config
Restart-Service sshd
&lt;/powershell&gt;
</code></pre>

<h2 id="additional-notes">Additional Notes</h2>

<p>With this you have just scratched the surface of using PowerShell Remoting. Here are a few other areas you could continue learning about.</p>

<ul>
  <li>The implementation of OpenSSH Server is not full feature parity. Microsoft does <a href="https://learn.microsoft.com/en-us/windows-server/administration/openssh/openssh_server_configuration">document the configuration options</a> for your review.</li>
  <li>Although password based authentication is easy, using <a href="https://learn.microsoft.com/en-us/windows-server/administration/openssh/openssh_keymanagement">certificate based authentication is preferable and supported</a>.</li>
  <li>This is a great option if you want simple and quick, but as you begin to need more complex identity management integrations <a href="https://learn.microsoft.com/en-us/powershell/scripting/learn/remoting/wsman-remoting-in-powershell-core">WinRM can become more favorable</a>.</li>
  <li>Jordan Borean has delved deep on these topics and shares many great insights with you on <a href="https://www.bloggingforlogging.com/">his blog</a>.</li>
  <li><a href="https://gist.github.com/Snozzberries/74d24e9eb3d0dc9b9ecb56030275a871#kerberos-double-hop">Resource-Based Constrained Delegation</a> is also supported to utilize Kerberos S4U for the double hop scenario support.</li>
</ul>]]></content><author><name>Mike Soule</name></author><category term="Other" /><summary type="html"><![CDATA[When working in public cloud environments like AWS or Azure, frequently you will need to create a lot of new Windows Server instances that are short lived. Often using RDP to access these is cumbersome. You may find yourself having similar needs or may just be looking for a shell-first administration experience. PowerShell Remoting offers a great answer. You can simply run Enter-PSSession and be on your way. The only downside is the default configuration isn’t the most accommodating. The default configuration relies on WinRM, Microsoft’s WS-Management protocol implementation, which provides many excellent features but requires more dependencies. You’d want to be domain joined and have proper certificates configured to really use it smoothly. More on that to come later. You want to have a shell-first experience, but you want to use a transport protocol you can set up quickly and without many dependencies. Enter PowerShell Remoting over SSH! You will want to keep reading to see a quick way to get started! Prerequisites You need to tackle a couple of prerequisites: Windows Server 2019 or newer PowerShell 7 or newer Local Admin Account Installing OpenSSH Server You will use the below combo to get the latest version of OpenSSH Server and add the Windows Capability Package to your instance. The Get-WindowsCapability -Online command provides you with all the capability packages available to you. You pass all those packages through the pipeline to |?{$_.Name -like "OpenSSH.Server*"}. Using the ?{} alias for Where-Object and you target the Name property of your capability packages that begins with “OpenSSH.Server”. Finally, you pass the capability packages that match your property criteria through the pipeline to |Add-WindowsCapability -Online. This will acquire and install the capability package on your instance. Get-WindowsCapability -Online|?{$_.Name -like "OpenSSH.Server*"}|Add-WindowsCapability -Online Testing OpenSSH Server Now that you installed the OpenSSH Server. You will want to start it and make sure it is able to run. Use Start-Service sshd to turn on the server and then Test-NetConnection localhost -Port 22 to see if the server is listening on the default SSH port. Start-Service sshd Test-NetConnection localhost -Port 22 If you run into challenges here. You could have other processes bound to port 22 already, you may have older versions of OpenSSH Server installed, or a number of other issues. The Windows Event Log would hopefully provide a good starting point for what may be an issue. Configure Password Authentication Since you want a simple path forward, you will just enable password authentication. With the commands below you use the cp alias to copy the current OpenSSH Server config and append .old to the filename. Then you use the gc alias to get the contents of the config file with -repace to uncomment the specific config line. You finish by passing the content with the change through the pipeline to the sc alias to set the content for the config file. Finally, you can restart the service to have the new config file take effect. cp "$env:ProgramData\ssh\sshd_config" "$env:ProgramData\ssh\sshd_config.old" (gc "$env:ProgramData\ssh\sshd_config") -replace "#PasswordAuthentication yes", "PasswordAuthentication yes" | sc $env:ProgramData\ssh\sshd_config Restart-Service sshd Configure Kerberos Single Sign-On Authentication Another awesome capability is support for the GSSAPI libraries for Kerberos Single Sign-On (SSO) authentication. This is an optional capability but can provide a much cleaner access experience. Windows to Windows works smoothly, implementations with Linux SSH servers add more complexity but should still be viable. (gc "$env:ProgramData\ssh\sshd_config") -replace "#GSSAPIAuthentication no", "GSSAPIAuthentication yes" | sc $env:ProgramData\ssh\sshd_config Restart-Service sshd Connecting to Your Server You can now use Putty or another SSH client. When you connect, your session prompt will default to Windows Command Prompt (i.e., cmd.exe). You will not be able to use PowerShell Remoting with Enter-PsSession at this point. You will set the default prompt to PowerShell Core using the New-ItemPropery commandlet to set the DefaultShell value of the OpenSSH key within the HKEY_LOCAL_MACHINE\SOFTWARE hive registry path. The data within the key’s value is the path to the PowerShell Core executable using the short filename path (i.e., 8.3 filename). The value of c:/progra~1/powershell/7/pwsh.exe is the default location. Then you will need to restart the SSH service. When you next connect you will see your PowerShell Core prompt. New-ItemProperty -Path "HKLM:\SOFTWARE\OpenSSH" -Name DefaultShell -Value "c:/progra~1/powershell/7/pwsh.exe" -PropertyType String -Force Restart-Service sshd OpenSSH Subsystem To enable the PowerShell Remoting functionality (e.g., Enter-PsSession) you will need to configure an OpenSSH Subsystem. This will allow OpenSSH to create a PowerShell process for the remoting session to connect with. With the commands below you use the gc alias to get the contents of the config file with -repace to uncomment the specific config line. You finish by passing the content with the change through the pipeline to the sc alias to set the content for the config file. You can restart the service for the new config file take effect. (gc "$env:ProgramData\ssh\sshd_config") -replace "# override default of no subsystems", "$&amp;`nSubsystem powershell c:/progra~1/powershell/7/pwsh.exe -sshs -nologo -noprofile" | sc $env:ProgramData\ssh\sshd_config Restart-Service sshd Using Enter-PSSession Once you configure your server for the subsystem and authentication methods you can begin using Enter-PSSession. If you want to use the Kerberos SSO functionality with GSSAPI, then you need to specify the client options when connecting. A simple method to accomplish this is shown below. $options = @{ GSSAPIDelegateCredentials = "yes" GSSAPIAuthentication = "yes" } Enter-PSSession -HostName &lt;FQDN&gt; -Options $options Resource-Based Constrained Delegation is also supported to utilize Kerberos S4U for the double hop scenario support. Putting It All Together Circling back on how to apply all of this. You can use the following as an AWS User Data script to: Identify, download, and install the latest version of PowerShell Core. Acquire, install, and set the startup to automatic for OpenSSH Server service. Attempt to add a firewall rule allowing access to OpenSSH Server. Setting the default shell to PowerShell Core for OpenSSH Server interactive sessions. Create a backup copy of the default sshd_config file. Configure PowerShell Core as an OpenSSH Server Subsystem to allow for asynchronous commands. Configure OpenSSH Server to allow password authentication. Apply the configuration changes with a restart of the OpenSSH Server service. &lt;powershell&gt; $r=[System.Net.WebRequest]::Create("https://github.com/PowerShell/PowerShell/releases/latest") $r.AllowAutoRedirect=$false $r.Method="Head" $t=$r.GetResponse().Headers["Location"] $v=$t.substring($t.indexOf("/tag/v")+6,$t.length-$t.indexOf("/tag/v")-6) irm https://github.com/PowerShell/PowerShell/releases/download/v$v/PowerShell-$v-win-x64.msi -OutFile ".\Powershell-$v-win-x64.msi" Start-Process msiexec.exe -Wait -ArgumentList "/I Powershell-$v-win-x64.msi /quiet /l*v .\Powershell-$v-win-x64.msi.log" Get-WindowsCapability -Online|?{$_.Name -like "OpenSSH.Server*"}|Add-WindowsCapability -Online Start-Service sshd Set-Service -Name sshd -StartupType 'Automatic' New-NetFirewallRule -Name 'OpenSSH-Server-In-TCP' -DisplayName 'OpenSSH Server (sshd)' -Enabled True -Direction Inbound -Protocol TCP -Action Allow -LocalPort 22 New-ItemProperty -Path "HKLM:\SOFTWARE\OpenSSH" -Name DefaultShell -Value "c:/progra~1/powershell/7/pwsh.exe" -PropertyType String -Force cp "$env:ProgramData\ssh\sshd_config" "$env:ProgramData\ssh\sshd_config.old" (gc "$env:ProgramData\ssh\sshd_config") -replace "# override default of no subsystems", "$&amp;`nSubsystem powershell c:/progra~1/powershell/7/pwsh.exe -sshs -nologo -noprofile" | sc $env:ProgramData\ssh\sshd_config (gc "$env:ProgramData\ssh\sshd_config") -replace "#PasswordAuthentication yes", "PasswordAuthentication yes" | sc $env:ProgramData\ssh\sshd_config (gc "$env:ProgramData\ssh\sshd_config") -replace "#GSSAPIAuthentication no", "GSSAPIAuthentication yes" | sc $env:ProgramData\ssh\sshd_config Restart-Service sshd &lt;/powershell&gt; Additional Notes With this you have just scratched the surface of using PowerShell Remoting. Here are a few other areas you could continue learning about. The implementation of OpenSSH Server is not full feature parity. Microsoft does document the configuration options for your review. Although password based authentication is easy, using certificate based authentication is preferable and supported. This is a great option if you want simple and quick, but as you begin to need more complex identity management integrations WinRM can become more favorable. Jordan Borean has delved deep on these topics and shares many great insights with you on his blog. Resource-Based Constrained Delegation is also supported to utilize Kerberos S4U for the double hop scenario support.]]></summary></entry><entry><title type="html">Azure Arc Managed Identities</title><link href="http://log.noworseoff.com/2023/07/29/azure-arc-managed-identity.html" rel="alternate" type="text/html" title="Azure Arc Managed Identities" /><published>2023-07-29T00:00:00+00:00</published><updated>2023-07-29T00:00:00+00:00</updated><id>http://log.noworseoff.com/2023/07/29/azure-arc-managed-identity</id><content type="html" xml:base="http://log.noworseoff.com/2023/07/29/azure-arc-managed-identity.html"><![CDATA[<p><a href="https://snozzberries.github.io/2022/05/15/AzureManagedIdentityPowerShell.html">Previously</a> I wrote up how to work with the Azure Instance Metadata Service (IMDS) with Azure Virtual Machines to utilize Azure Managed Identities.</p>

<p>Managed identities can provide many benefits and can be even considered a modern replacement for <a href="https://learn.microsoft.com/en-us/windows-server/security/group-managed-service-accounts/group-managed-service-accounts-overview">group managed service accounts (gMSA)</a> in Active Directory (AD) Domain Services (DS). Especially as you have growing needs to work with process automation of your cloud services.</p>

<p>Now you can see an example of using this concept with four modern enhancements.</p>

<p>Contents:</p>
<ul>
  <li><a href="#pre">Prerequisites</a></li>
  <li><a href="#setup">Setup Azure Arc</a>
    <ul>
      <li><a href="#id">Identify an Azure Resource Group</a></li>
      <li><a href="#arc">Setup Arc</a></li>
      <li><a href="#mi">Use your machine’s identity</a></li>
      <li><a href="#mib">Use your machine’s identity token</a></li>
      <li><a href="#mig">Use your machine’s identity with the Graph API</a></li>
    </ul>
  </li>
  <li><a href="#sec">Security thoughts</a></li>
</ul>

<h2 id="prerequisites-">Prerequisites <a name="pre"></a></h2>

<p>You will need six pieces to make this come together:</p>

<ul>
  <li>Familiarity with Azure and PowerShell</li>
  <li>Entra ID Tenant</li>
  <li>Azure Subscription</li>
  <li>Azure Resource Group</li>
  <li>A Windows Server instance</li>
  <li>PowerShell 7.*</li>
</ul>

<blockquote>
  <p>The <a href="https://learn.microsoft.com/en-us/azure/azure-arc/servers/prerequisites#supported-operating-systems">Azure Arc Connected Machine Agent supports operating system environments</a> other than Windows Server as well.</p>
</blockquote>

<h2 id="setup-azure-arc-">Setup Azure Arc <a name="setup"></a></h2>

<p>Your experience setting up Azure Arc should be painless.</p>

<h3 id="identify-an-azure-resource-group-">Identify an Azure Resource Group <a name="id"></a></h3>

<p>Within your Azure Subscription, identify an existing Azure Resource Group (RG) or create a new RG that your Azure Arc machines will reside in. Make sure you note the region you use as well.</p>

<p><img src="https://github.com/Snozzberries/snozzberries.github.io/assets/431932/99bf56fc-1170-4267-85ad-955045d29d2d" alt="image" /></p>

<blockquote>
  <p>Azure Resource Group “Arc” within the Azure Portal.</p>
</blockquote>

<h3 id="setup-arc-">Setup Arc <a name="arc"></a></h3>

<p>Once you have an RG the machine will reside in. Open PowerShell on your instance and install the necessary modules, connect to Azure, and then connect the machine. You can see these commands shown below. You can replace <code>Arc</code> with your RG name, <code>$env:COMPUTERNAME</code> with a resource name you prefer, or <code>eastus</code> with another Azure Region.</p>

<blockquote>
  <p>You can use <code>-UseDeviceAuthentication</code> to do a device code flow authentication in case you are working in a headless environment like Windows Server Core.</p>
</blockquote>

<pre><code class="language-powershell">Install-Module Az.ConnectedMachine, Az.Accounts
Connect-AzAccount -UseDeviceAuthentication
Connect-AzConnectedMachine  -ResourceGroupName Arc -Name $env:COMPUTERNAME -Location eastus
</code></pre>

<blockquote>
  <p>Depending on how you want to use your identity, it is worth taking note that the <code>Connect-AzConnectedMachine</code> cmdlet creates the <code>IDENTITY_ENDPOINT</code> machine environment variable. Meaning you may need to start a new PowerShell session, reboot, or manually set the environment variable equal to <code>[System.Environment]::GetEnvironmentVariable("IDENTITY_ENDPOINT","Machine")</code> for the following sections to work.</p>
</blockquote>

<h3 id="use-your-machines-identity-">Use your machine’s identity <a name="mi"></a></h3>

<p>Now you can just append the <code>-Identity</code> property to your connect cmdlets and you will authenticate with your managed identity.</p>

<pre><code class="language-powershell">Connect-AzAccount -Identity
</code></pre>

<p>You will find that your managed identity does not have any subscription when it connects though.</p>

<pre><code class="language-powershell">Account   SubscriptionName TenantId                             Environment
-------   ---------------- --------                             -----------
MSI@&lt;ID&gt;                   &lt;GUID&gt;                               AzureCloud
</code></pre>

<p>You can confirm this by getting your current context.</p>

<pre><code class="language-powershell">Get-AzContext|Format-List
</code></pre>

<pre><code class="language-powershell">Name               : &lt;GUID&gt; - MSI@&lt;ID&gt;
Account            : MSI@&lt;ID&gt;
Environment        : AzureCloud
Subscription       :
Tenant             : &lt;GUID&gt;
TokenCache         :
VersionProfile     :
ExtendedProperties : {}
</code></pre>

<p>Once you add your managed identity to an Azure Role Assignment you can connect again and see your updated context includes the subscription.</p>

<blockquote>
  <p>If you make role assignments to multiple subscriptions ensure you set the appropriate subscription you want the Az cmdlets to use with <code>Set-AzContext</code>.</p>
</blockquote>

<h3 id="use-your-machines-identity-token-">Use your machine’s identity token <a name="mib"></a></h3>

<p>You can also request a bearer token from the Azure Arc IMDS that you can then use with direct API calls. <a href="https://learn.microsoft.com/en-us/azure/azure-arc/servers/managed-identity-authentication#acquiring-an-access-token-using-rest-api">Microsoft’s documentation</a> provides a Windows PowerShell example. The following is a PowerShell Core example.</p>

<pre><code class="language-powershell">$apiVersion = "2020-06-01"
$resource = "https://management.azure.com/"
$endpoint = "{0}?resource={1}&amp;api-version={2}" -f $env:IDENTITY_ENDPOINT,$resource,$apiVersion
$secretFile = ""
try
{
    Invoke-WebRequest -Method GET -Uri $endpoint -Headers @{Metadata='True'} -UseBasicParsing
}
catch
{
    $wwwAuthHeader = $_.Exception.Response.Headers|?{$_.Key -eq "WWW-Authenticate"}|% value
    if ($wwwAuthHeader -match "Basic realm=.+")
    {
        $secretFile = ($wwwAuthHeader -split "Basic realm=")[1]
    }
}
Write-Host "Secret file path: " $secretFile`n
$secret = cat -Raw $secretFile
$response = Invoke-WebRequest -Method GET -Uri $endpoint -Headers @{Metadata='True'; Authorization="Basic $secret"} -UseBasicParsing
if ($response)
{
    $token = (ConvertFrom-Json -InputObject $response.Content).access_token
    Write-Host "Access token: " $token
}
</code></pre>

<blockquote>
  <p>You should treat bearer tokens as secrets. Be cautious with how you store, transfer, and use them.</p>
</blockquote>

<h3 id="use-your-machines-identity-with-the-graph-api-">Use your machine’s identity with the Graph API <a name="mig"></a></h3>

<p>Another use case that comes up is working with the Microsoft Graph API. The <code>Connect-MgGraph</code> cmdlet also supports managed identity authentication though. As simple as before, you can use your Azure Arc Connected Machine’s Managed Identity.</p>

<pre><code class="language-powershell">Install-Module Microsoft.Graph.Authentication
Connect-MgGraph -Identity
Get-MgContext
</code></pre>

<p>You may even want to start by using a managed identity with the <a href="Exchange Online PowerShell Module">https://learn.microsoft.com/en-us/powershell/exchange/connect-exo-powershell-managed-identity</a>.</p>

<h2 id="security-thoughts-">Security thoughts <a name="sec"></a></h2>

<p>As you look to use managed identities to simplify your operational environment, please be mindful that often the log events for any access will only show the managed identity service principal as the client. Meaning if you allow interactive access to an instance with a managed identity, you need to correlate the local systems security logs with the API authentication logs to see who the real identity is interacting with the API as the managed identity.</p>

<p>The Cybersecurity and Infrastructure Security Agency (CISA) in a joint effort with other national defense agencies around the world provided <a href="https://www.cisa.gov/news-events/alerts/2022/06/22/keeping-powershell-measures-use-and-embrace">guidance on PowerShell configurations</a>.</p>]]></content><author><name>Mike Soule</name></author><category term="Other" /><summary type="html"><![CDATA[Previously I wrote up how to work with the Azure Instance Metadata Service (IMDS) with Azure Virtual Machines to utilize Azure Managed Identities.]]></summary></entry><entry><title type="html">JupyterHub Configuration Example</title><link href="http://log.noworseoff.com/2023/07/18/jupyterhub-configuration-example.html" rel="alternate" type="text/html" title="JupyterHub Configuration Example" /><published>2023-07-18T00:00:00+00:00</published><updated>2023-07-18T00:00:00+00:00</updated><id>http://log.noworseoff.com/2023/07/18/jupyterhub-configuration-example</id><content type="html" xml:base="http://log.noworseoff.com/2023/07/18/jupyterhub-configuration-example.html"><![CDATA[<p>With running JupyterHub there are many configuration combinations you may choose to use. Below you will learn about a few common configurations that could be valuable for your configurations.</p>

<ul>
  <li>AWS Fargate Spawner</li>
  <li>Named Servers with API Service</li>
  <li>Spawner Callbacks</li>
  <li>Entra ID Authentication (Azure AD Authentication)</li>
</ul>

<h2 id="prerequisite">Prerequisite</h2>

<p>As a matter of good practice you won’t want your secrets in your configuration file. You will want to include a helper function to get a secret from your secret vault. Below we have an example with AWS Secrets Manager that you can use with your <code>jupyterhub_config.py</code> file. This function is used by a couple of the following sections.</p>

<pre><code class="language-python">import json
import boto3
from botocore.exceptions import ClientError
def get_secret(secret, key):
    secret_name = secret
    region_name = "us-east-1"
    session = boto3.session.Session()
    client = session.client(
        service_name='secretsmanager',
        region_name=region_name
    )
    try:
        get_secret_value_response = client.get_secret_value(
            SecretId=secret_name
        )
    except ClientError as e:
        raise e
    secret = get_secret_value_response['SecretString']
    val = json.loads(secret)
    return val[key]
</code></pre>

<h2 id="aws-fargate-spawner">AWS Fargate Spawner</h2>

<p>Your JupyterHub instance can spawn Jupyter Notebook instances as AWS Fargate Tasks. This open source <a href="https://github.com/uktrade/fargatespawner">Fargate Spawner</a> provides a way to interface with the AWS APIs to create new tasks.</p>

<p>You can install the package to your JupyterHub Docker image as shown below.</p>

<pre><code class="language-docker">RUN pip3 install fargatespawner
</code></pre>

<p>Then within your <code>jupyterhub_config.py</code> file you will need to specify how you would like the spawner to create the tasks. Then finally you will want to configure how the spawner will authenticate with the AWS APIs.</p>

<pre><code class="language-python">from fargatespawner import FargateSpawner
c.JupyterHub.spawner_class = FargateSpawner
c.FargateSpawner.aws_region = 'us-east-1'
c.FargateSpawner.aws_ecs_host = 'ecs.us-east-1.amazonaws.com'
c.FargateSpawner.notebook_port = 8888
c.FargateSpawner.notebook_scheme = 'http'
c.FargateSpawner.get_run_task_args = lambda spawner: {
    'cluster': 'jupyterLabs',
    'taskDefinition': 'JupyterLab:2',
    'overrides': {
        'containerOverrides': [{
            'command': spawner.cmd,
            'environment': [
                {
                    'name': name,
                    'value': value,
                } for name, value in spawner.get_env().items()
            ],
            'name': 'dotnet',
        }],
    },
    'count': 1,
    'launchType': 'FARGATE',
    'networkConfiguration': {
        'awsvpcConfiguration': {
            'assignPublicIp': 'ENABLED',
            'securityGroups': ['sg-012345678abcd0123'],
            'subnets':  ['subnet-abcd0123','subnet-0123abcd'],
        },
    },
}

from fargatespawner import FargateSpawnerECSRoleAuthentication
c.FargateSpawner.authentication_class = FargateSpawnerECSRoleAuthentication
</code></pre>

<h2 id="named-servers-with-api-service">Named Servers with API Service</h2>

<p>You may want to use named instances that can be spawned independent of a user interaction. To accomplish this you can allow named servers, setup a spawner with admin permissions that uses an API secret from your secret vault. These can be defined in your <code>jupyterhub_config.py</code> file.</p>

<pre><code class="language-python">c.JupyterHub.allow_named_servers = True

c.JupyterHub.services = [
    {
        "name": "spawner-admin",
        "api_token": get_secret('JupyterHubService','api_token')
    },
]

c.JupyterHub.load_roles = [
    {
        "name": "service-role",
        "scopes": [
            "admin:users",
            "admin:servers",
        ],
        "services": [
            "spawner-admin",
        ],
    }
]
</code></pre>

<h2 id="spawner-callbacks">Spawner Callbacks</h2>

<p>When you want to run JupyterHub itself as a container instance, the configuration needs a little more guidance for how the Notebook instances should communicate with it. The below <code>jupyterhub_config.py</code> file snippet requires you to set most notably the <code>c.Spawner.hub_connect_url</code> to the URL of your JupyterHub instance which the Jupyter Notebook instance will communicate with.</p>

<pre><code class="language-python">c.Spawner.ip = '0.0.0.0'
c.Spawner.port = 8888
c.Spawner.env_keep = ['PYTHONPATH', 'CONDA_ROOT', 'CONDA_DEFAULT_ENV', 'VIRTUAL_ENV', 'LANG', 'LC_ALL', 'JUPYTERHUB_SINGLEUSER_APP']
c.Spawner.hub_connect_url = 'https://jupyter.your.domain.com'
c.Spawner.start_timeout = 120
</code></pre>

<h2 id="entra-id-azure-ad-authentication">Entra ID (Azure AD) Authentication</h2>

<p>Enabling single sign-on with your existing Identity Provider (IdP) simplifies the experience for the users of your JupyterHub instance and the administrator burden as well. For this setup you will use Microsoft Entra ID Authentication, formerly known as Azure AD Authentication.</p>

<p>You can install the prerequisite Python packages in your JupyterHub Docker image as shown below.</p>

<pre><code class="language-docker">RUN pip3 install PyJWT
RUN pip3 install oauthenticator
</code></pre>

<p>With your prerequisites installed you can configure your <code>jupyterhub_config.py</code> file to utilize the <a href="https://oauthenticator.readthedocs.io/en/latest/tutorials/provider-specific-setup/providers/azuread.html">OAuthenticator</a> package. You will need to specify your Entra ID Tenant ID (Azure AD Tenant ID) GUID for the <code>c.AzureAdOAuthenticator.tenant_id</code> property. Specify your JupyterHub callback URL for the authentication flow to return your users to with the <code>c.AzureAdOAuthenticator.oauth_callback_url</code> property. The Client ID of your Entra ID Application with the <code>c.AzureAdOAuthenticator.client_id</code> property. Then finally make sure your Client Secret is within your secret vault.</p>

<pre><code class="language-python">from oauthenticator.azuread import AzureAdOAuthenticator
c.JupyterHub.authenticator_class = AzureAdOAuthenticator

c.AzureAdOAuthenticator.tenant_id = '0123abcd-01ab-ab01-abcd-0123abcd4567'

c.AzureAdOAuthenticator.oauth_callback_url = 'https://jupyter.your.domain.com/hub/oauth_callback'
c.AzureAdOAuthenticator.client_id = 'abcd0123-ab01-01ab-dcba-45670123abcd'
c.AzureAdOAuthenticator.client_secret = get_secret('JupyterHub', 'client_secrect')
c.AzureAdOAuthenticator.scope = ['openid']
</code></pre>

<h2 id="summary">Summary</h2>

<p>Through this post you saw how to setup:</p>

<ul>
  <li>A helper function to pull secrets from AWS Secrets Manager</li>
  <li>Configure JupyterHub to use an AWS Fargate Spawner</li>
  <li>Configure JupyterHub to allow Named Servers with an API Service</li>
  <li>Configure Spawner Callbacks to a dynamic JupyterHub instance</li>
  <li>Configure JupyterHub to use Entra ID Authentication (Azure AD Authentication)</li>
</ul>

<p>There is plenty more configuration you can do with JupyterHub and the Jupyter ecosystem in general.</p>]]></content><author><name>Mike Soule</name></author><category term="Other" /><summary type="html"><![CDATA[With running JupyterHub there are many configuration combinations you may choose to use. Below you will learn about a few common configurations that could be valuable for your configurations.]]></summary></entry><entry><title type="html">AWS EBS Partition Alignment</title><link href="http://log.noworseoff.com/2022/07/23/aws-ebs-partition-alignment.html" rel="alternate" type="text/html" title="AWS EBS Partition Alignment" /><published>2022-07-23T00:00:00+00:00</published><updated>2022-07-23T00:00:00+00:00</updated><id>http://log.noworseoff.com/2022/07/23/aws-ebs-partition-alignment</id><content type="html" xml:base="http://log.noworseoff.com/2022/07/23/aws-ebs-partition-alignment.html"><![CDATA[<p>Within AWS EBS GP2, what is the optimal partition alignment?</p>

<p>Conclusion 4096 Bytes.</p>

<p>Testing performed with CrystalDiskMark 8.0.4 64-bit in Windows Server 2022 on a t3.medium EC2 instance in US-East-1.</p>

<h2 id="analysis">Analysis</h2>

<table>
  <thead>
    <tr>
      <th>Test</th>
      <th>System Default (MB/s)</th>
      <th>Test 1 - 4 KiB (MB/s)</th>
      <th>Test 2 - 4000 KiB (MB/s)</th>
      <th>Test 3 - 16 KiB (MB/s)</th>
      <th>Test 4 - Default (MB/s)</th>
      <th>Best (MB/s)</th>
      <th>Worst (MB/s)</th>
      <th>Delta (%)</th>
    </tr>
  </thead>
  <tbody>
    <tr>
      <td>Sequential 1 MiB Read with 8 queues &amp; 1 threads</td>
      <td>137.77</td>
      <td>137.39</td>
      <td>137.72</td>
      <td>138.81</td>
      <td>138.18</td>
      <td>138.81</td>
      <td>137.39</td>
      <td>1</td>
    </tr>
    <tr>
      <td>Sequential 1 Mib Read with 1 queues &amp; 1 threads</td>
      <td>137.13</td>
      <td>137.37</td>
      <td>136.96</td>
      <td>137.15</td>
      <td>137.34</td>
      <td>137.37</td>
      <td>136.96</td>
      <td>0</td>
    </tr>
    <tr>
      <td>Random 4 KiB Read with 32 queues &amp; 1 threads</td>
      <td>12.8</td>
      <td>12.82</td>
      <td>12.76</td>
      <td>12.68</td>
      <td>12.85</td>
      <td>12.85</td>
      <td>12.68</td>
      <td>1</td>
    </tr>
    <tr>
      <td>Random 4 KiB Read with 1 queues &amp; 1 threads</td>
      <td>12.63</td>
      <td>12.76</td>
      <td>12.5</td>
      <td>12.63</td>
      <td>12.8</td>
      <td>12.8</td>
      <td>12.5</td>
      <td>2</td>
    </tr>
    <tr>
      <td>Sequential 1 MiB Write with 8 queues &amp; 1 threads</td>
      <td>137.57</td>
      <td>140.48</td>
      <td>138.01</td>
      <td>138.18</td>
      <td>137.59</td>
      <td>140.48</td>
      <td>137.57</td>
      <td>2</td>
    </tr>
    <tr>
      <td>Sequential 1 Mib Write with 1 queues &amp; 1 threads</td>
      <td>137.97</td>
      <td>137.78</td>
      <td>137.37</td>
      <td>137.14</td>
      <td>137.77</td>
      <td>137.97</td>
      <td>137.14</td>
      <td>1</td>
    </tr>
    <tr>
      <td>Random 4 KiB Write with 32 queues &amp; 1 threads</td>
      <td>12.6</td>
      <td>14.09</td>
      <td>11.3</td>
      <td>14.3</td>
      <td>14.69</td>
      <td>14.69</td>
      <td>11.3</td>
      <td>30</td>
    </tr>
    <tr>
      <td>Random 4 KiB Write with 1 queues &amp; 1 threads</td>
      <td>4.1</td>
      <td>7.18</td>
      <td>5.89</td>
      <td>6.39</td>
      <td>6.88</td>
      <td>7.18</td>
      <td>4.1</td>
      <td>75</td>
    </tr>
  </tbody>
</table>

<h2 id="default-system-drive">Default System Drive</h2>
<ul>
  <li>MBR</li>
  <li>1048576 B Offset</li>
</ul>

<h2 id="test-1">Test 1</h2>
<ul>
  <li>GPT</li>
  <li>4 KiB alignment
    <pre><code class="language-powershell">  New-Partition -DiskNumber 1 -UseMaximumSize -Alignment 4096 -AssignDriveLetter
</code></pre>
  </li>
  <li>16777216 B offset</li>
</ul>

<h2 id="test-2">Test 2</h2>
<ul>
  <li>GPT</li>
  <li>4000 KiB alignment
    <pre><code class="language-powershell">  New-Partition -DiskNumber 1 -UseMaximumSize -Alignment 4096000 -AssignDriveLetter
</code></pre>
  </li>
  <li>20480000 B offset</li>
</ul>

<h2 id="test-3">Test 3</h2>
<ul>
  <li>GPT</li>
  <li>16 KiB alignment
    <pre><code class="language-powershell">  New-Partition -DiskNumber 3 -UseMaximumSize -Alignment 16384 -AssignDriveLetter
</code></pre>
  </li>
  <li>16777216 B offset</li>
</ul>

<h2 id="test-4">Test 4</h2>
<ul>
  <li>GPT</li>
  <li>Default alignment
    <pre><code class="language-powershell">  New-Partition -DiskNumber 1 -UseMaximumSize -AssignDriveLetter
</code></pre>
  </li>
  <li>16777216 B offset</li>
</ul>]]></content><author><name>Mike Soule</name></author><category term="Other" /><summary type="html"><![CDATA[Within AWS EBS GP2, what is the optimal partition alignment?]]></summary></entry></feed>